It has really been a long time! As a matter of fact, it’s been over seven months since I posted. Wow, how time flies! No, I didn’t fall off the edge of the earth; I am still living with and taking care of my mom. I did have a terrible case of “lost cro-jo”, though, and this is why you haven’t heard from me.

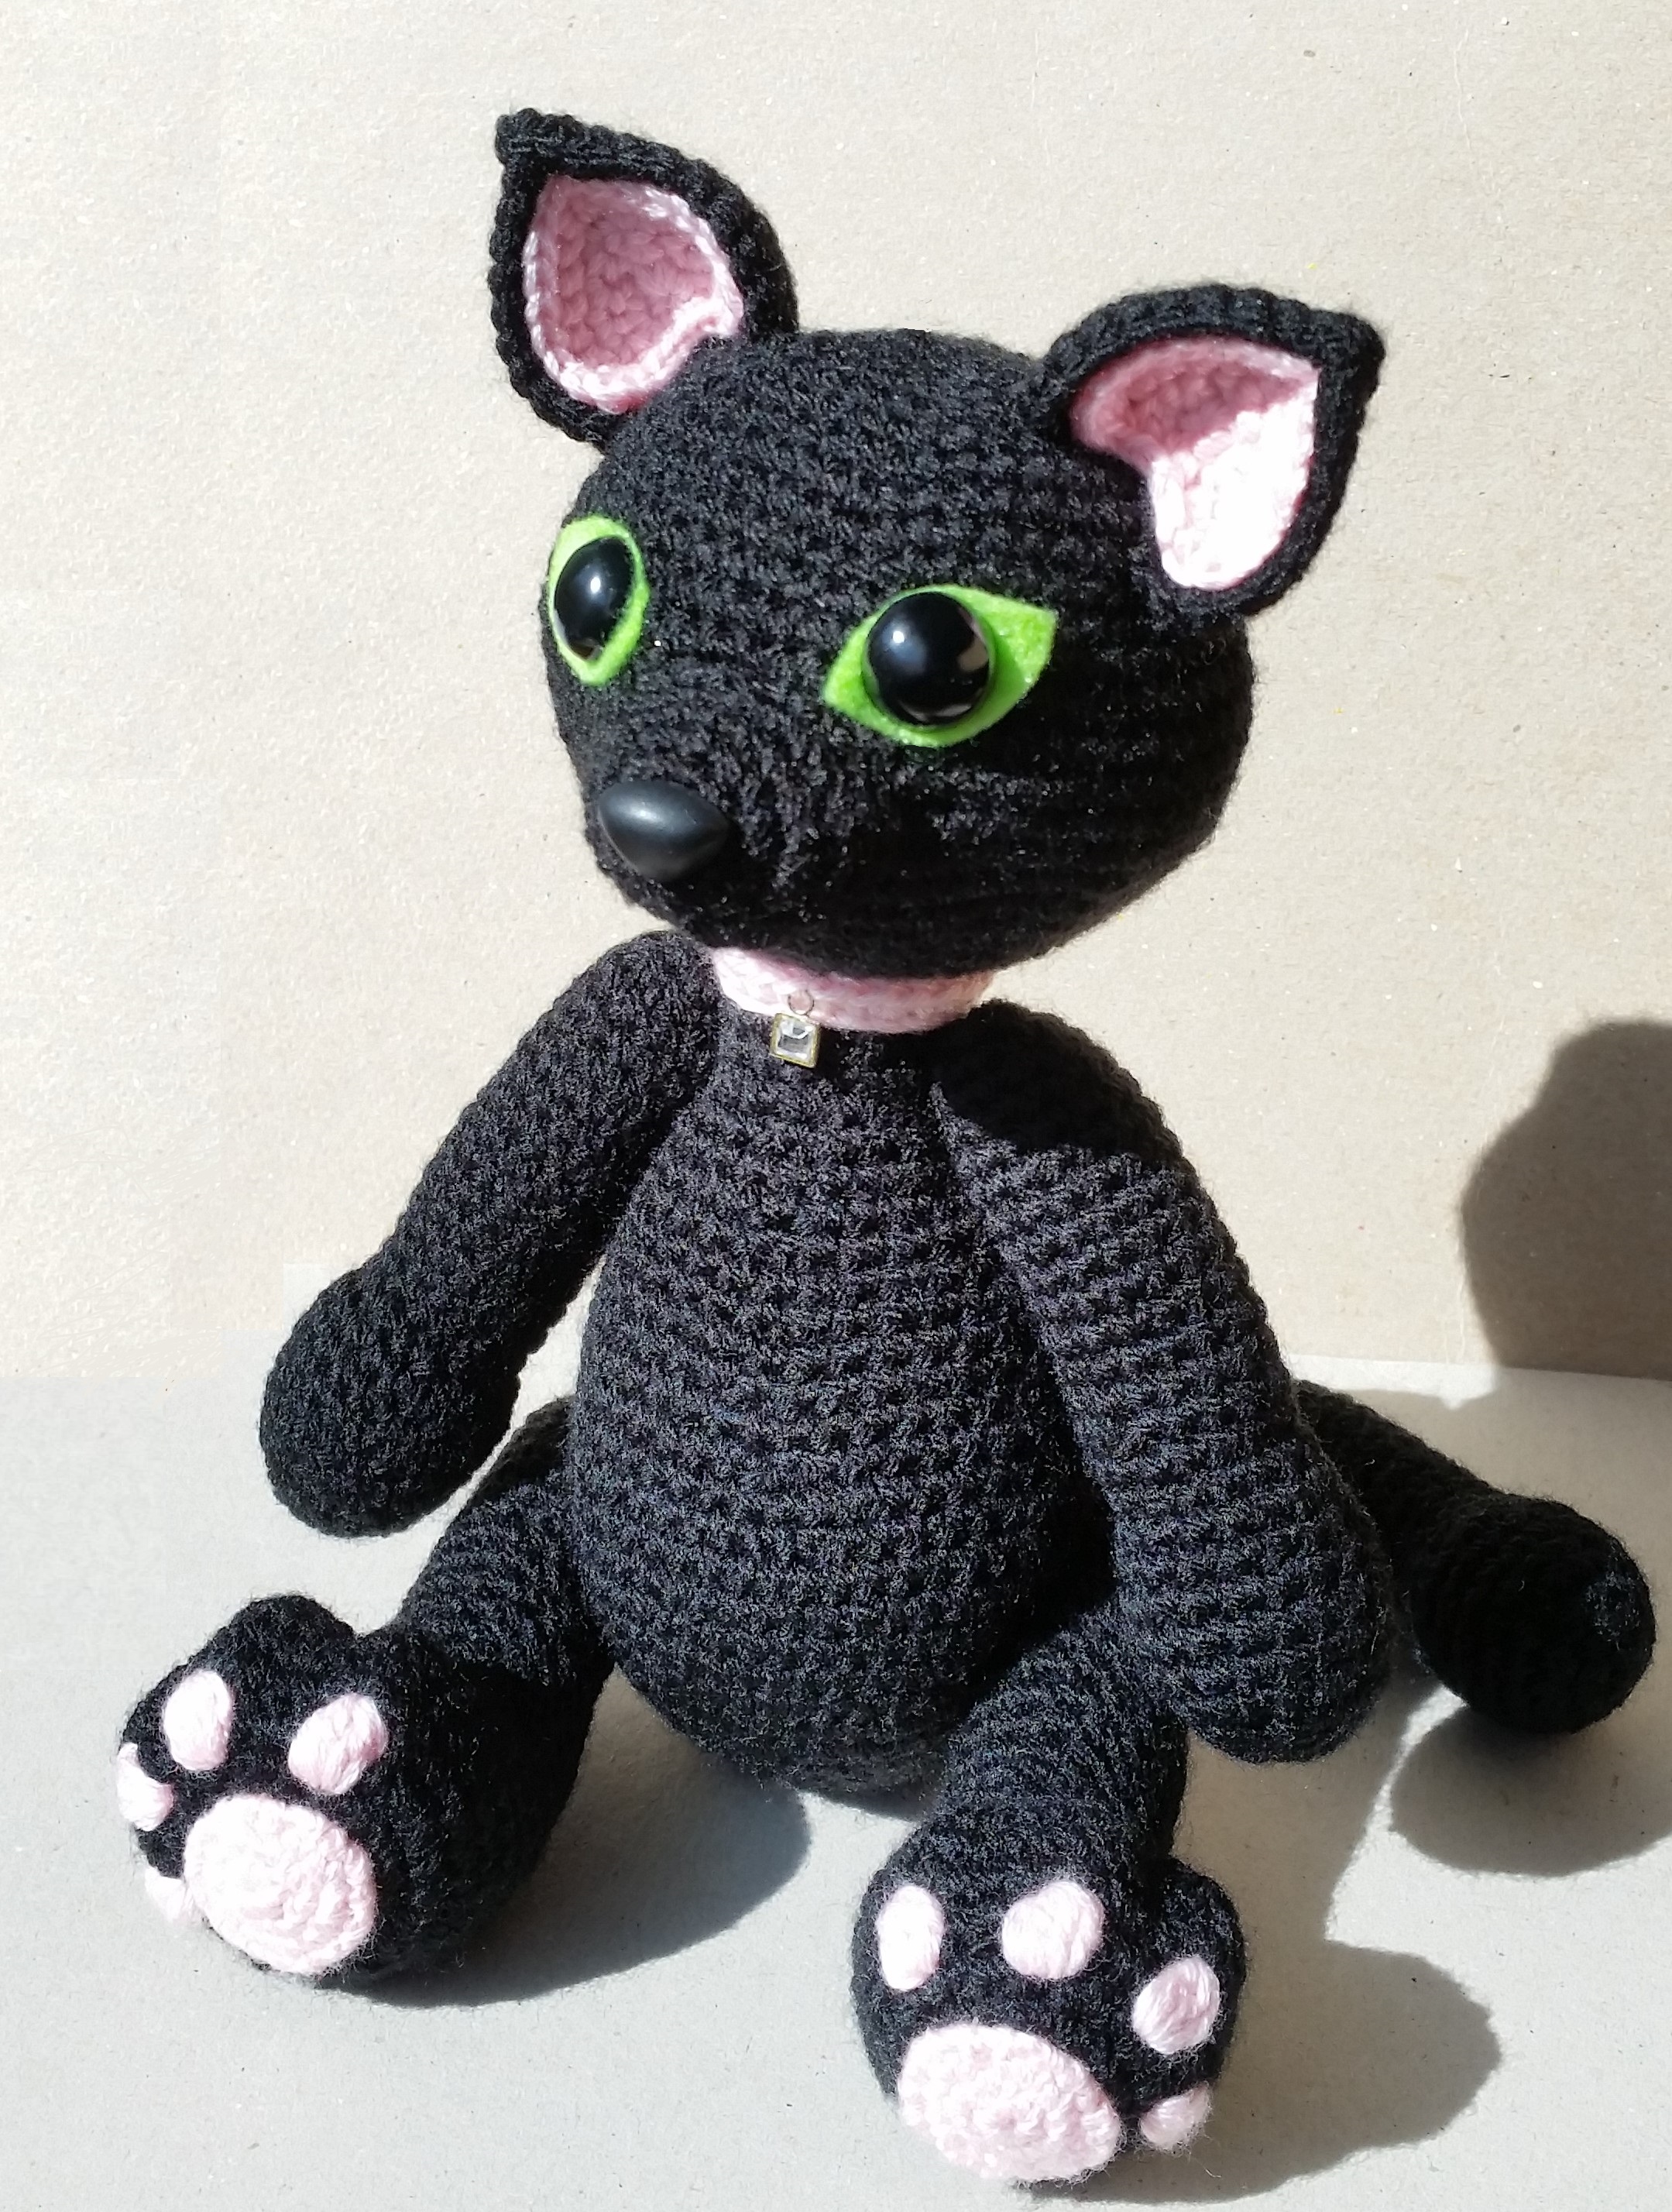
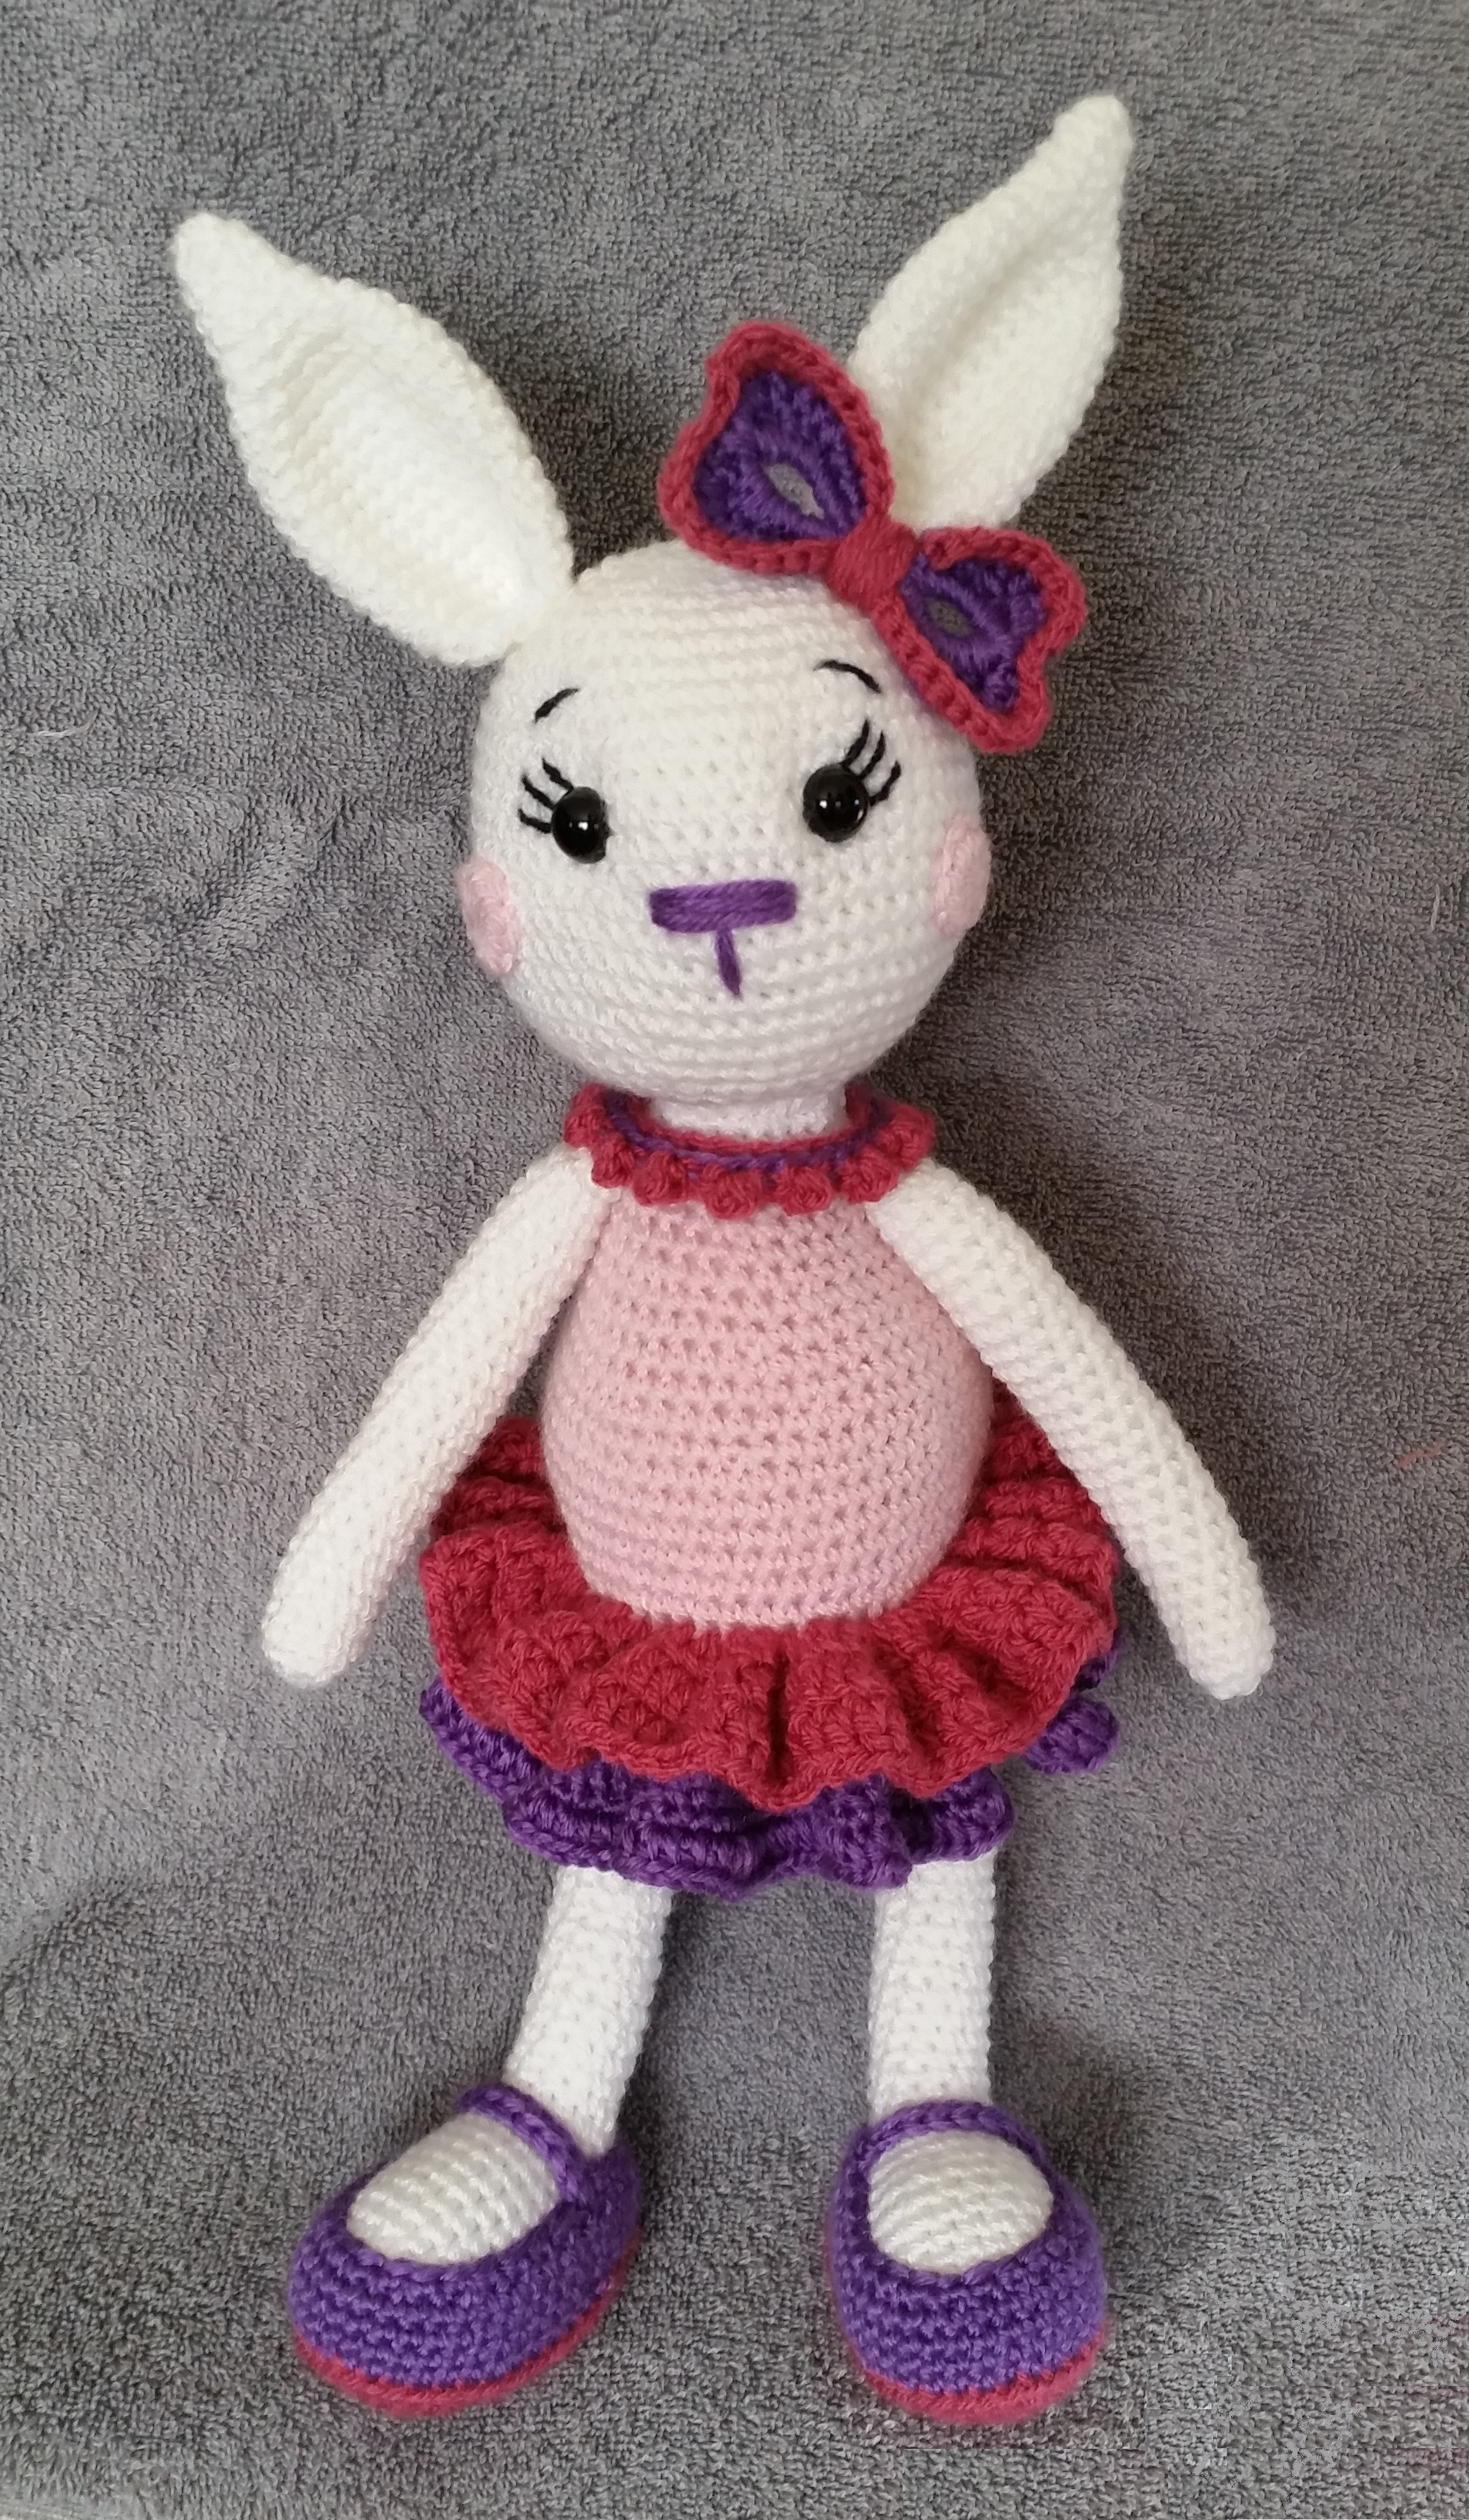
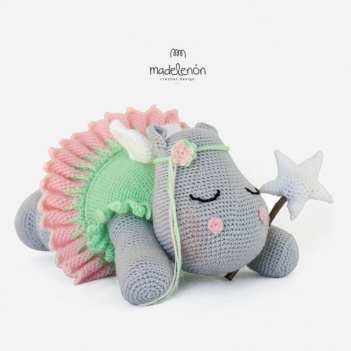
If you recall from some previous posts, I was in the process of creating stuffed animals for my sister’s grandchildren. All of them had been done except Riley’s dragon, which was the most complicated and detailed. You will be glad to know that he is finally done and is safely in my sister’s hands for Christmas gift-giving. You have no idea how relieved I am. I was beginning to have nightmares about giving these stuffed animals to college-age kids, and although they are a little bit older than what I was planning (the gifts were supposed to be given at Easter), none of the children have officially hit puberty yet. (All right – maybe one. But he was tall to begin with.) So here they are (horn tooting) – the long awaited grandchildren’s stuffed animals!

Emily’s Ballerina Bunny, bunny pattern here; bow pattern here
Sophie’s Black Cat, pattern here
Lorelai’s Toy Owl, pattern here
Abbie’s German Shepard Puppy, pattern here
Paden’s Fiery Dragon, pattern here
Riley’s Magnificent Dragon, pattern here

A little side note about Riley’s dragon – the original design was meant to go over a sphere-shaped lamp. I just wanted the dragon to be placed on a table or shelf, so there were adjustments to the pattern that I had to do. Just FYI, in case anyone is daring enough to be up for the challenge of making this behemoth!

One more thing. Sorry I have two different size typefaces on this post, but while I was away, WordPress decided to change things and so I’m going through another learning curve. I found out how to add photos (Yay for me!), but I don’t know how to correct the typeface. Maybe next time. In the meantime, stay safe, stay well, and happy crocheting!

I certainly hope this post finds you and yours healthy and not going too stir crazy from stay-at-home orders. At the time I’m writing this, a few states are lifting the orders, which makes some people very happy and some people very apprehensive. I just wish the best for everyone, no matter what your personal decision may be.

Things have just been going along here. I’m appreciating the warmer temps, and I can’t wait to plant my spinach. That is, if the seeds ever get here. (I think they’re sitting in some abandoned postal warehouse – I’m expecting a ransom note any time now!) I’m still working on Riley’s dragon. My, that thing has so many parts; obviously I won’t be showing you any photos of him yet. Who would want to see a bunch of dragon pieces?

I did take a slight detour, though. My son’s fiance’s birthday was March 28th, and I did send her a card, but I told her she’d have to wait for her present. I can’t recall how I came across the pattern, but I found the Tendril Shawl by Annie Design Crochet and I felt it would be just perfect for her. The pattern is free but the suggested yarn was the most expensive yarn I’ve ever bought – ah, but what a yarn! It was 60% superwash merino wool, 20% silk and 20% yak, soft as butter, beautiful drape, subtle sheen, and fantastic color. Plus it was a dream to work with. Thank goodness it only took one skein!

CopyAB

The pattern called for a 4mm hook and I didn’t have one, so I chose to use a 3.75mm instead. Mine turned out about 60″ long and 26″ deep on the picot side, smaller than the designer’s version, but that’s ok. I did have enough yarn left over to do scs across the top edge, which I think gave it a little more finished look. I was definitely playing yarn chicken, but I won with about a yard left!

20200426_121909A

20200425_143640 - Copy (2A)

Trust me when I say the photos I took don’t do this yarn justice. I even took the pictures in natural light, but I just couldn’t get it to look as good as the real thing. Oh, well.

Everyone please take care and stay well – and happy crocheting!

Yes, I said I was going to post once a month. I also realize I blew it for March. However, on March 15th (beware, right?) my mother and I both came down with the coronavirus. We haven’t been tested, so I can’t be absolutely positive, but I’m pretty sure. Luckily it was fairly mild for both of us, although my mom still needs a little more recoup time. My heart goes out to all of you who have had this horrible virus, and especially to those who have lost someone to it. Plus a HUGE THANK YOU to all the healthcare workers, front line people, and everyone who work to keep society’s necessities available and stocked.

There is so much talk about people going stir crazy dealing with the “stay at home” order. It must be very difficult for people who don’t have an inside hobby, or at least something they can do within the vicinity of the house. I have never been so glad that I have crochet! From what I’ve seen online, many others feel the same way. So many WIPs, and now the time!

I’m still working on the amigurumis for my sister’s grandchildren, and I’ve finished Paden’s dragon. (Actually, it was supposed to be Riley’s, but I feel it’s a little too delicate for him, so his big brother is going to get it.) The pattern is from Megan Lapp of Crafty Intentions, and I would consider this to be for experienced crocheters well versed in amigurumi. I’m very happy with how mine turned out, but there were some parts that I found difficult. Maybe that’s because I’m not that experienced with amigurumi!

20200304_125018

Eventually to be Paden’s Dragon

Earlier this year my niece posted a pic of a crocheted Baby Yoda and stated that she NEEDED one. Yes, NEEDED. She is a married woman in her forties with a lovely little girl. I LOVE IT! But alas, many patterns for Baby Yoda had to be deleted due to copyright infringements. Eventually I did find one and it is still available from Albina of AmigoRoom Toys. Perhaps I’m very picky, but many of the patterns I saw were not very professional looking. Albina’s version is very cute and quintessential amigurumi. But I couldn’t help but fiddle with it.

20200406_163303

My Baby Yoda

And fiddle I did. I wasn’t happy with the first one, so I had to make a second. Then I wasn’t happy with the height or collar, so today I took it apart, made adjustments, and put it back together. Now I’m happy. Oh, what we do for the love of crochet!

If you recall, all of these amigurumi were supposed to be done for Easter. The grandchildren are not aware that I’m making anything for them, so not making the deadline is no big deal for those. However, it was my niece’s husband that commissioned me to do Yoda and I promised him an Easter delivery. So it’s off to the post office and keep my fingers crossed it gets there in time*!

To all – please take care and don’t get sick. But most of all, happy crocheting!

*I wrote this post last week, but I couldn’t publish it until my niece received her Yoda – just in case she reads this blog, I didn’t want to spoil the surprise.

I said I was going to post right after Christmas to show you what ornaments I made for my family. Well, it IS after Christmas…almost Valentine’s Day…but let’s not get picky. The fact is that I have been pretty busy with things to do, not only for myself, but for my mom too. Plus I’ve started a really neat dragon (one of the six presents for my sister’s grandchildren) that’s been giving me fits! I usually don’t have such problems with patterns, but the yarn is black and I do most of the work in the evening. Bad combination, I guess.

Anyway, I had found a super cute snowman pattern from Repeat Crafter Me and I knew this would be this year’s ornament. I used sport weight yarn instead of the recommended worsted weight, so I had to add a couple rows in the head and body to keep the size. I didn’t have any cute buttons to use for the hats, or any orange yarn for the nose. I used red yarn and wrapped it around the hat like a ribbon, and cut a strip of cardboard and rolled it to fill the inside of the hat – I felt it gave the hat more definition than fiberfill. I really lucked out for the nose. I found Purple Pirate Studios on Etsy, and she makes half inch polymer clay carrot noses! They were perfect! All I did was rub the flat end against an emery board and put a generous amount of tacky glue on that end, place the nose on the face, hold it for 30 seconds and then let it dry. My snowmen with the hat were about 4 inches high, and the half inch noses were just right. I also gave them thicker multi-colored scarves. Maker’s Note – Snowmen’s eyes look better if they’re a little close together. I don’t know why, but they do.

20191120_153518 (2)20191224_134659 - Copy (2)

I  have also finished the German Shepard for one of the granddaughters. It’s the best one I could find (pattern by AmberCraftStore on Etsy); however, the pattern could’ve been better written and there could’ve been more/better photos for clearer explanation. I figured everything out, but this pattern is definitely for the intermediate if not advanced amigurumi crocheter. The only thing I’m really not happy with are the front legs. I feel they should have an extension to create a shoulder that would blend better into the body (the dragon pattern has this). If I have time, I’ll rework the front legs so they look better.

20200124_134816 - Copy

Well, I’d better get going – that dragon isn’t going to make itself! Then I still have an even more advanced dragon to make (I saved the hardest for the last), plus I offered to make a Baby Yoda for my niece. Everything has to be made by Easter.

And then I will exhale.

Happy crocheting!


Oh my, how the time flies! I certainly hope this post finds you happy and healthy and enjoying the season. Keeping my fingers crossed for my mother and I, so far so good. My mom did come down with a relatively mild case of the flu in November (she had gotten a flu shot) so she wasn’t able to enjoy Thanksgiving with the family, but things are looking on track for Christmas.

This year I crocheted a little something for my family, but I can’t show you what I made because I do have a couple family members that read these posts and that would give away the surprise. It will just have to wait until after Christmas – but that doesn’t mean I don’t have something to show you. I found this adorable elf, and being in the spirit, I decided to give her a go. The “Free Pattern: Small Christmas Elf” from Kristi Tullus is so cute, but I saw a couple photos of what other people created and decided to give her a little more finished look with white edging on her hat, dress and shoes. I also put pipe cleaners in her arms and legs so they could bend a little.

I’ve said I’m making stuffed animals for all my mother’s great grandchildren, and two of the six have been completed. And now – just in time for the holidays – Ta Da! – the Ballerina Bunny for Emily. Emily is the newest addition to our family, being born just last June, so she won’t be getting to play with this bunny for quite a while. I’m sure when her parents feel she’s ready, the bunny will be given a  warm welcome.

I bought the pattern for “Bunny Lilu” from Tanya Kostochenkova of Crochet Friends Lab on Etsy. I lucked out because she was having a half price sale; at this writing she has a 25% off sale going. For the most part the pattern was well written, and I was able to figure out the couple of glitches without too much trouble.

Bunny Lilu

Bunny Lilu from Crochet Friends Lab

My Ballerina Bunny turned out a little larger (16″ versus almost 12″) because I used DK weight yarn and  a D 3.25mm hook, but that was fine with me. I wasn’t a fan of the two little bows by the ears, so I used the “Crochet Hearts” hair bow from Katrina Payne at  Rebel Skein (don’t you love that name?). I did use joints for her legs, but if I make another I’ll follow what the designer had in mind. She created the joints by putting buttons on the outside of the “hips” and sewing through the body and both legs.

20191222_134944 (2)

My version of “Bunny Lilu”

20191222_135121 (2)

Well, this is my last post of 2019. I hope you all had a terrific year. I wish you a wonderful holiday season and an even better 2020! And of course, Happy Crocheting!

Snowflake


I like to make little crocheted Christmas presents for my family and friends in California, and even though I’m in Chicago now, I still want to keep up this “tradition”. I decided that this year would be snowflakes. How difficult to decide among the hundreds of patterns out there! But there was one that really caught my eye, and as soon as I saw it I knew this would be it.

Julia is the designer, and her blog and etsy store is called Draiguna. If you aren’t familiar with this fantastic designer, please check out her work. She primarily works with size 10 crochet thread and her work is magnificent! She has put together a whole “Wispweave” series and released her free snowflake pattern just in time for me to use it.  (I’m sure she planned it that way!!!)

Just because I have an overwhelming need to make patterns “my own”, I did tweak this pattern just a little bit – I left off the last picot on the tips because I wanted a slightly more compact flake. I also used two colors –

20191113_110527 (2)

My version with a white border

20191113_110838 (2)

My version with a colored border

I like them with the two colors because they remind me of fancy decorated sugar cookies. I bought some glitter paint to add a little sparkle, but I wasn’t impressed with what I bought. The glitter was too fine and only showed up under bright light. Oh well. I’m sure the people getting them will forgive me.

Now here’s the funny part. There have been posts on crochet forums about NOT crocheting when you’re tired. Good advice! I did a test snowflake in solid blue when I was pretty tired one night, and the next morning I looked at it and realized I had really messed up the pattern in the middle. The amazing thing to me is that the rest of the rounds actually worked out!  A Christmas miracle to be sure.

20191124_133212 (2)

I wish everyone a Happy Thanksgiving and a great shopping weekend, and as always – Happy Crocheting!

After my last post I said that I was going to start the black cat. Well, that was kind of true. But first I decided to take a break and crochet the Cuddle Me Bear from Amigurumi Today. That bear stole my heart quite a while ago and I just couldn’t wait any longer. Plus, the designer has taken basically the same body and created quite a few more animals, each cuter than the next (of course!) and she’s come out with some mini versions, about 4″ tall. If you enjoy amigurumi, please check out this site – you’ll be glad you did. Just be prepared for an overload of cuteness!

cuddle-me-bear-amigurumi

Cuddle Me Bear from Amigurumi Today, pattern here


20190919_130332 - Copy 2

My Version

But never fear! After my appetite for 6″ tall bears was sated, I did go on to crochet the black cat. I finally decided on a very cute guy named Charlie the Kitten by Kate E. Hancock. (Please click on the link if you want to see Charlie; I am not a tech wizard and my computer will not let me copy him to his post.)

Black Cat 3

My version of Charlie the Kitten

My version ended up being rather different than the designer’s because 1. the request was for a green-eyed black cat and 2. I wanted to make her female, so I made the feet smaller and the arms a little shorter. This is the first black item I’ve made. Now I know why people don’t work with dark colors other than as an accent! Plus trying to take a photo that would show some detail was challenging too. Luckily I had a sunny day.

As you might know if you’ve followed this blog, it was six years ago this month that I tried my hand at a crochet business. I had some sales, but in truth, I’ve made a lot more money with garage sales than with this business! Wearing every hat to try to run a creative business was just beyond me. Plus, since I have come to take care of my mother, there is always something that needs to be tended to, which leaves me even less time. So I have closed the doors to my Bonanza store and I might do the same to my Pinterest, Tumbler, and Twitter accounts. I intend to keep writing this blog and to keep my Facebook account, at least for the time being.

I do want to sincerely thank everyone that has followed my blog or just dropped by to check out what was happening – especially those who have left comments! – and I will do my best to get more posts up in the future. Till then, happy crocheting!


I believe it was back in July that I decided to make amigurumis for my sister’s grandchildren. I began by asking them what their favorite animal was (and it didn’t have to be real – fantasy animals were fine). Even though I’ve done some amigurumi designing, I wasn’t even going to try to come up with the variety these kids gave me – a green-eyed black cat, an owl, a German shepherd, and two dragons.

I found some really great patterns, bought the yarn, and was excited about starting. I chose the owl to begin with –

Toy Owl (2)

Toy Owl by Tanya Makarova of NustyUA,  pattern here

I think it was probably a good thing I started with the owl, while my energy and enthusiasm were at a good level. I’m happy with the outcome, but what a lot of work!

20190906_185520 - Copy

My version of the Toy Owl

20190906_185819 - Copy

A side view of my version

The pattern, for the most part, was written pretty well. The designer had another person translate the pattern into English. There were a few mistakes, but nothing I couldn’t figure out. I would definitely consider this project for a very practiced intermediate or  advanced crocheter. There were so many feathers to sew on! Then after I sewed them on – pretty much just at the top of each feather – I realized that I needed to go back and tack down the sides and tip so they wouldn’t keep flipping up, which made for a very disheveled looking bird. He didn’t have to be perfect, but I didn’t want him to look like he’d had a go-round with a windmill!

Then I found I had to reinforce the edges of the wing feathers because they were very floppy. If I wasn’t giving this to a seven-year-old, I’d have crocheted around wire for the edges, but I didn’t want to risk it. Whip-stitching the edges with brown and then black seems to have worked pretty good. And if that wasn’t enough extra work, I also needed to whipstitch the feathers around his face because I wanted them to stand out a little bit, not lay flat.

I’ve decided to do the black cat next. I do have an extremely bright craft light to help me along with this (no, I’m not that much of a masochist!), plus this cat doesn’t look nearly as complicated as the owl. As always, happy crocheting – and wish me luck!

It looks like since I’ve been in Chicago to take care of my mom that one post a month on my blog will probably be the best I’ll be able to do. {It has been determined that my mom needs someone to live with her, so I’ll be staying in Chicago.} All the “after hospital” visits are now over so things have quieted down considerably. Whew! I appreciate the quiet. Now my next venture is to really go through the house and clean. I hate housework, but despite what my mom says, I know she hasn’t been able to really properly clean for at least a few years now (and of course she refused to get a maid!). So today I attacked the tv room. It took over two hours, but it’s as clean as I can get it.

In between all the appointments, cooking, and other cleaning, I did manage to get a few hours in the evenings to work on more cross stitch.  Currently I’m at four down and seven more to go, not counting the butterfly –

20190709_101458 - Copy (2)20190709_101707 (2)20190709_101652 - Copy (2)

It always amazes me at how long these small kits take to do, but then again, they do have so many little stitches! As you can see, I haven’t cut them out to assemble the ornaments yet. I’ll get to that later. I know – famous last words!

Now, as I said in my last post, I’ve been going through extreme crochet withdrawl. Trust me, it has not been pretty. Then I had a chance to meet up with my nieces and nephews and their children recently, and it dawned on me that I’ve never made anything for this latest generation. What a horrid aunt I’ve been! So I asked them all what their favorite animal was and I’m in the process of making amigurumi for them. Luckily, I was able to find adorable patterns for each of the animals. Paid patterns (except for one), but cute just the same. This is the one for Lorelei that I’m working on now.

Toy Owl (2)

Toy Owl by Tanya Makarova of NustyUA, pattern here

This owl is sooo cute, but you definitely need some patience. So. Many. Feathers!!! And then you have to sew each one on. I’m sure it will be worth it, though. With any luck, my next post will show you the end result. Till then – happy crocheting!

At the beginning of this year I promised myself that I would post every week and become much more involved in social media to try to promote my store’s patterns and products. For a while I wasn’t doing too bad. But for those who have been paying attention, you know I totally fell off the wagon mid-April. Well, there was a very good reason for that.

On April 11th my mom fell and dislocated her hip replacement. This is the second time she’s done that, and the third time she’s fallen. Of course she went to the hospital and they put her hip back in place, along with three weeks of rehab. She came home May 1st and I have been living with/taking care of her since (I flew out from CA to Chicago the last week in April). But I guess when you’re as old as my mom (92 yrs – and yes, she still lives in her own home), the medical oversight can’t stop there. The past four weeks have been a whirlwind of physical therapy, occupational therapy, home nurse visits, personal care visits, and doctor appointments. Tomorrow we go to her orthopedist, where she’s wants to get the ok to take off the massive hip brace she’s wearing. Let’s hope!

Of course, all this has meant that I have had to put any crochet on hold. After the last baby blanket I made, my hands (particularly my thumbs) were complaining loudly, so I decided to take a little break and try my hand at a beautiful counted cross stitch butterfly. I now realize how important it is to be AWAKE when you attempt counted cross stitch. I do believe that I’ve messed up part of the butterfly. I decided to put it aside and practice with other simpler counted cross stitch projects, hoping that these will get my brain in gear for the butterfly.

20190525_174828 (2)

The Wire Whimsy kits are copyrighted 1995. Could it be possible I bought them THAT long ago?!! Anyway, I think I was in Joanne’s after Christmas one year and these were on sale for 75 cents each (normally $4.49), so I picked up eleven of them. They have been very patiently waiting in a box for me – with a couple of other projects (that I haven’t touched either) to keep them company. So far I’ve managed to finish the one Santa. I didn’t like the stars on his goodie bag so I didn’t include them, but I do want to put something on the bag because it looks a bit plain. I’ll figure something out, but suggestions are welcome.

20190525_174720 (2)

My version of Santa

When I was packing for the trip, I wanted to bring some yarn with me but just got the hooks in the suitcase. The plan was for me to stay until Mom got the brace off (6 to 8 weeks), and packing for such a long stay is daunting! Anyway, I packed the yarn and the suitcase ended up two inches too large. If the airline wanted to get picky they could’ve charged me an extra $200. I chose not to risk it.  The yarn had to be left behind, but I brought all the cross stitch ornaments.

I broke down, though. I am going through a severe crocheting withdrawal (yes, really!!!) and I couldn’t help myself – a company offered $1.99 shipping and I ordered five skeins of #1 lace yarn. It’s Lion Brand Amazing Lace, and I’m so hoping I won’t be disappointed. The reviews were good – keeping my fingers crossed. I already have at least two patterns I want to make with the yarn, so I’m ready!

At this point things are up in the air as to whether I’m going to stay here with my mom or go back to CA. Much depends on how well she can do for herself on a daily basis. My SIL has been a Godsend – taking care of the shopping and driving her back and forth to appointments – but that’s the limit for her, considering she’s still running her own family. I still have another month to go, so we’ll just have to wait and see. In the meantime, I’ll post when I can – and as always, Happy Crocheting!


Spring has always been one of my favorite seasons. There’s just something about the colorful flowers starting to peek out after a long cold winter. It’s actually rather rejuvenating! So to pay proper homage to the spring flowers, I’ve collected some of the prettiest crochet ones I could find to share with you.

Flower 1

One of my favorites – free pattern from Little Monkey’s Crochet

Flower 2 (2)

The elegance of a single rose – free pattern from Crochet Beja

Flower 5 (2A)

Beautiful Irish crochet, free tutorial found at Pretty Ideas

purple flower

Lovely purple specimen from Yaseminin Orguleri, free tutorial video

Flower 3

Who can resist a gorgeous poppy? Free pattern from Cut Out and Keep

Flower 4 (2)

Delightful flower from Tina’s Handicrafts, free tutorial here

Flower 6 (2)

Delicate beauty from NotikaLand; find the free tutorial here

I hope you enjoyed this little field trip into crocheted botany, and as always, Happy Crocheting!

Well, I was definitely doing a bit of nail-biting on this baby shower present, but I  managed to get it done just in time. I sent it to my sister so she could bring it to the party. It went out in the mail last Wednesday and was received Friday – and the shower was yesterday! (Me doing my happy dance!)

IMG_1233

Ta Da! The “Love & Kisses” Baby Blanket

I’ve worked on this Hearts ZigZag stitch baby blanket for the last three weeks or so. I love the end result, and now that I’ve finally finished it, I’ll know better what to do in the future if I should ever decide to make this again – give myself plenty of time (considering this stitch is made up mainly of single crochets) and to go up at least one hook size to save my poor arthritic thumbs! I also included one of the Cuddly-Baby amigurumi dolls by Lilleliis that I made a while back.

IMG_1238AB

For a reward (and to give my still aching thumbs a MUCH needed rest), I bought a present for myself of a butterfly cross stitch kit from Rachel Nichols of LeiaPatterns. She has a delightful assortment of cross stitch items, and you can just buy the pattern or the kit (with or without a hoop). She also carries adorable needle minders, wooden pendant blanks to cross stitch, and 20% off your first purchase for joining her email club.

Butterfly, cross stitch

Rainbow Cross Stitch Butterfly by LeiaPatterns.

I have already started the butterfly, and even though I haven’t done any counted cross stitch in a long time, it seems like it’s going ok. The colors are beautiful and vibrant, and I really can’t wait to finish. Best of all, my thumbs aren’t complaining!

As always, happy crocheting!

If you’ve never checked out the ILOVE-CROCHET site, please do yourself a favor and visit soon! This site literally has pages upon pages of free crochet patterns available. As their description states, “We share everyday (the) most popular free patterns and video tutorials from around the world.”  The site will show a few photos of the product on the pattern page and when you scroll down there will be a link to a video tutorial. Now not all the videos are in English or have English subtitles to them, but of the ones I’ve tried, they are generally very well filmed and with a little patience you can follow what’s being done.

ILOVE-CROCHET also has a Pinterest page here, which is extremely popular with 159k followers and over 10m views a month. I wasn’t able to find out the name(s) of the person/people who run this site (I’m no tech wizard!), so I can only guess that they want the crochet to speak for itself. They have 85 pages of stitch tutorials to completed project videos with six or more items per page. The English used on the site leads me to believe this is a second language for the person, but it’s still quite understandable.

Granny Square - Copy

Learn-To-Crochet-Easy-Baby-Blanket

Learn-To-Crochet-Tunisian-Stitch

Above are some examples of what you can find on the site – a floral granny square, wavy stitch baby blanket, and a Tunisian Honeycomb stitch. If you’ve yet to visit this site, give yourself a treat and try it. And, as always – Happy Crocheting!

Since it is spring and Easter is around the corner, I thought I’d toot my own horn and let you know of a pattern that’s available in my store – my Grandpa Easter Bunny!

Grandpa BunnyA

He’s all decked out in his Easter finery, and there’s even a free carrot pattern that can be ordered with him. He’s crocheted from about 100 yards of white sport-weight acrylic yarn (3.5mm hook), small amounts of size 10 cotton crochet thread (2.00 mm hook) for the clothes, pompoms for the muzzle/nose/tail, and 15 – 20mm wiggle eyes. He ends up about 8″ tall, depending on how you pose the ears. The pattern is written in English using U.S. terms. I would recommend this pattern for an intermediate crocheter, or one that is well-versed in making amigurumi. Please note that pattern delivery isn’t immediate. I have to email it to you, and I check my store every morning for purchases.

My sister feels that grandpa is lonely and is in need of a companion, and she has been patiently waiting for me to create a grandma version. I believe she’s right, but it always seems that I’m knee deep in other projects when it’s this time of year. I am lucky, though – Grandpa Easter Bunny hasn’t complained so far, and he’s always happy when spring comes around. Perhaps you can make one of your own to join your family this Easter!

Apparently I have entered the stage of my life where the “children” are now having children. I’m not a grandmother yet, but I know plenty of women who are. That being said, one of my sister-in-law’s girls is currently expecting her third – the gender has not been revealed – and so I thought it would be nice to make something for the newbie.

IMG_1200 - CopyA

So, what to make? In trying to keep with my use-up-the-stash resolution, I wandered through the yarn I had and found some light yellow and golden yellow, perfect for something gender neutral. And then, Voila! – the Sunshine Baby Blanket was born.

IMG_1203 - CopyA

I recently discovered the Crystal Wave stitch and I wanted to try my hand at it (pattern by Crochet for Baby) so that became the bulk of the blanket. Then I decided to use the golden yellow to create a small bobble border. Just because I think bobbles are fun, and babies should have fun things!

IMG_1204 - CopyA

Then lastly, I needed to find a little sun for the corner of the blanket. There are many adorable suns in Crochetland, but the sweet little Sol Amigurumi from Vanessa Doncatto of the Yarn Handmade’s Ravelry Store stole my heart – and it’s a free pattern, too! Definitely a win-win.

So as I try to get “You are my Sunshine” out of my head, I wish you happy crocheting!

As much as I love textured crocheted stitches, I think it’s time to give a lacy stitch a turn. I found this one on Pinterest, originally from a Russian site, crochetpattern.ru. No name was given for the stitch. I realize it’s just a shell alternated with a v-stitch, but I really enjoy it’s openwork look, plus the fabric it creates still has some body to it – not like some lacy stitches that just go limp.

Stitch, Russian - Copy A

Stitch, Russian - Copy A1

IMG_1219A

My versions of the stitch


IMG_1221A

I’ve tried this stitch in a few yarn weights (the sample was done in sport weight acrylic yarn, E hook), and I believe it would really work well in any weight from crochet thread #10 to worsted weight, possibly chunky #5. The only problem I found with the pattern was the second row. It shows that you’re supposed to skip four chains between the shell and V stitches, but I found it gave the chain a scalloped look. By only skipping three chains you end up with a nice straight edge; you can also eliminate one of the chains between the 1st dc and the 1st V stitch / last V stitch and last dc. At least that worked for me! But then again, I have a tendency to play with stitches and patterns (but don’t tell the designers, will you?!). Happy crocheting!

Irish crochet, of course! And what better time to showcase this sculptural lace than St. Paddy’s Day!

Paraphrased from Wikipedia, “Irish crochet” was originally developed in mid-nineteenth century Ireland as a method of imitating expensive Venetian point laces. Irish crochet lace is characterized by separately crocheted motifs, which were then assembled into a mesh background.

This lace is made with a very fine steel crochet hook and fine crochet cotton or linen thread. It begins with an outline of the pattern on a piece of cloth. Each motif is then crocheted separately, using cotton cord for volume and shaping. The finished motifs are then basted (sewn with a loose stitch for temporary tacking) onto a cloth in the shape of the pattern. The motifs are then joined using chains and picots. When all the motifs have been joined together forming one piece of lace the basting stitch is removed from the back cloth revealing the completed lace.

I’ve gathered the following examples of Irish lace from Pinterest, all coming from Russian sites. However, I did find a wonderful Facebook group called Irish Crochet Lab that is run by Larisa Chilton, who is an instructor and has developed an online course for those who want to learn Traditional and Modern Irish crochet lace. You can find Ms. Chilton’s Facebook page here and her website here. Enjoy!

Irish Crochet 2

From postila.ru, a type of Pinterest

Irish crochet 3

From postila.ru

Irish crochet 4

From Asia Verten website

Irish crochet 7

Another beauty from Asia Verten

Oh, yes, just one more thing. St. Paddy’s Day is also my brother-in-law’s birthday – Happy Birthday, Craig!

Another post in my “spotlight on designers” series, I’d like to introduce you to MJ Carlos, a self-taught crochet designer of adorable amigurumi and curator of the Hello Yellow Yarn shop. She lives with her husband and two children in Australia, and if you are not familiar with her work, you should give yourself a little cuteness fix and visit her website or store.

Chick and Bunny AB

Two of Hello Yellow Yarn’s free patterns available here

Her designs have a irresistible innocent simplicity to them, and I’m sure they would be very appropriate for the budding amigurumi crocheter. Obviously I’m not the only one who appreciates MJ’s work – her designs have been published in several books including two of the Zoomigurumi series. She offers free patterns on her website as well as very attractively priced patterns in her store (most under $3!).

I am only allowed to publish one of MJ’s photos on my blog (according to her copyright rules), so in keeping with upcoming holidays, I chose her Easter buddies. But really, if you’re interested in creating amigurumi at all, do yourself a favor and take a peek at the rest of her creations. And, as always, happy crocheting!

PS – Just so you’re aware, I do not get paid for any of my posts, nor is there any bartering or “quid pro quo” arrangement for my posts. These are all my opinions, and I publish them to spread a little crocheting delight into the world. Because – CROCHET!

I found this particular stitch on Pinterest. Originally it seems to have come from a Russian site, ellej.org, although I couldn’t find it currently on her page. I also couldn’t find a name associated with the stitch, so because of how my version looks, I decided to name it the Mini-Waves stitch. I used Caron SS and a size H hook to make the sample.

IMG_1196 - Copy (2)

My version – Ta Da!

The original photo looks a bit more like a honeycomb, but there are crochet stitches with that name already, so I took a pass.

Texture stitch 1 - Copy

After I made a swatch, I was really surprised at how it turned out. I had expected a thick, squishy textured stitch, possibly good for a scarf or even an afghan. It’s not. It’s very stretchy, which might be all right for a hat. It’s also a much more open stitch than what the original photo conveys (see second photo of my version below). The “wave” part is made from the ch 3 and it isn’t attached to the main fabric, so it would be very easy to get something stuck in it and pull it out of shape. This stitch might work better in a smaller but sturdy yarn (cotton blend perhaps) and you need to work it fairly tight.

IMG_1197A - Copy (2)

My version stretched and pinned to show open weave of the stitch

Texture stitch 1 - Copy (2)

I still really like the look of the Mini-Waves stitch, but I don’t feel it’s very practical. It might work for a hat as long as you’re careful not to catch anything in those ch 3’s, but it would be way to stretchy for an afghan/blanket and too delicate for a scarf. JMO!

Of course, you don’t have to take my opinion for it – why not give the Mini-Waves stitch a try for yourself? I’d love to hear what all of you have to say. And as always, happy crocheting!

I have yet to create a triangular shawl, but I love crocheting wraps! This one was made from the oh-so-pretty Vanna’s Glamour yarn, Diamond colorway with a beautiful silver metallic thread running through it; #2 weight, 96% acrylic / 4% other. Sadly, most of the pictures I took don’t show the glimmer of the silver strand, but the second photo is better. Trust me when I say that this yarn makes a very pretty evening/date/party wear accessory.

IMG_1126 - Copy (2.1)

I used a very simple stitch because I wanted a lacy look plus have the beauty of the yarn dominate. It was a V-stitch (dc, ch 3. dc), skip 3 chs, in 4th ch work v-stitch, repeat. In the second row you work 5 scs over each ch 3 of the V-stitches. In the third row you work a V-stitch in each 3rd sc of the scs worked in the 2nd row. Repeat rows 2 and 3. The edging was ch 3, ch 3 picot, ch 3, sc in 3rd sc of 5 scs; along the other three edges was just a simple ch 4, skip 2 chs, sc in next ch. Just for any of you that might be interested!

IMG_1126 - Copy2.1

It’s always so nice when you like what you’ve just made and I’m very happy how this turned out. Now that my latest creation is complete and ready to find a home, you can find it for sale in my shop here. Happy crocheting!

As pretty as the traditional granny square is, it seems that in the past few years that there has been an explosion of absolutely magnificent designs. Personally, I’ve never been really into motif-type designs (although I have made a couple of blankets with them), but with the designs I’m seeing now, I might just have a go!

Some designs are so detailed with many color changes, I’d think for time’s sake it would be best to work squares for the parameter of a blanket versus every part of it – but that choice is up to the crocheter, of course. I also love how some squares have been enlarged to make a throw pillow or miniaturized to make coasters. Without further adieu, here are my picks for some of the most beautiful of the designs available –

square, Blizzard-Warning 3

Very appropriate for this winter! Blizzard Warning from Polly of Every Trick on the Hook, free pattern here

square, Victorian-Dream-Square (2)

Victorian Dream Square by Cindy Arman, free pattern here. You know I had to include a little lace, right?

square, pondoland

Dainty, detailed, and delightful! The Pondoland Square by Jen Tyler, paid pattern here

square, modified granny

Love Ladder Square, free video instruction here. Even though this isn’t the most elaborate square, I really liked the twist on the basic design!

square, Granny-Square-Diagram-19 - Copy (2)

Absolutely sumptuous! Diagram #19 from Crochet Kingdom, free chart here

square, monkey (2)

One for the babies! Monkey Square by Caitie Moore of Thoresby Cottage,  paid pattern here. She has collaborated with AllCrochetPatterns.net with many more animal squares. Visit her blog for more info.

square, square star

Love the colors in this Amazing Star Square offered by Kathy B from Queen of All Crafts, paid pattern here

squre, elements

And last but not least, the Elements CAL from 2017 that gave us such dazzling patterns! Designed by Sandra Kuijer; free pattern here


Hope these have given you some inspiration – happy crocheting!

In my last post I discussed my attempt at trying to be more organized with my blog posts by coming up with categories. When I can, I’d like to showcase a designer that I found while perusing the internet that I think is really good and that you will enjoy, if you aren’t aware of her/him already. Today I would like to introduce you to Jennifer at Chain8Designs.

Unicorn headband

I belong to an email group called Bloglovin’, where you can sign up to receive posts from blogs you wish to follow – and they usually throw in a few more they think you might like. This Magical Unicorn headband design showed up in my feed, so of course I had to find out about the designer.

She doesn’t have a large assortment of designs (but then, neither do I!), but what she does have is wonderful. Jennifer also has Holiday Mouse and Festive Reindeer headbands, plus a fantastic Twitterpated Heart Beanie just in time for Valentines Day! And best of all – her patterns are free! So hurry and get over to see her work right now. You can also follow her on Instagram, facebook, and Pinterest. BTW, Jennifer’s pinterest boards are terrific, so make sure to check those out too.

I hope you enjoy Jennifer’s work as much as I do, and, as always – Happy Crocheting!

I’ve been trying to get myself out of the “blahs” lately, plus trying to get myself a bit more organized. So I came up with a plan to try to categorize my posts. You see, I don’t always have something new on the hook every week to show you – sometimes my best might be once a month! However, I’d prefer you not get bored and drop me altogether, so I’ve come up with categories of posts to find fresh material that will keep you interested. Sounds good anyway, doesn’t it?

One of these categories will be crochet stitches. Most of us crocheters like discovering new stitches, and even though I’ll do my best to find “new” ones, my main goal is to spotlight interesting textures from lace to bulky.  My latest find is the Crystal Wave stitch. It is a really simple stitch but creates a beautiful texture, and I’m currently using it to make a baby blanket designed by Crochet for Baby (you can find the free pattern here). Below are some examples of the stitch –

Crystal waves 1

Crystal Waves Baby Blanket by Crochet For Baby

Crystal Waves 2

Crystal Wave stitch blanket by Crafting4You, here

Crystal waves 3

Found on Pinterest here, no identity given

Crystal Waves Blanket

My version of the stitch

Crystal Waves Blanket 2

Crochet for Baby has a video of how to do the stitch plus an extra video on how to do the last row of single crochets here. If you do a google search, I’m sure you’ll find many more tutorials on this wonderfully textured stitch – Enjoy!


For whatever reason, I’ve been dealing with a rather long period of the “blahs”. It’s not often I get this way and usually after a couple weeks I snap out of it, but this time it’s lingering. This is how I felt by Christmas, and I ended up spending most of that day in and out of sleep on the couch.

santa cat

Perhaps part of it is because SoCal has been getting a lot of rain lately (our winter), and rain always makes me want to curl up under some blankets and just watch tv or read a good book.

Anyway, I have been making a valiant effort. Since my YS took his paper Christmas tree present with him when he moved out, I began a crochet tree to replace it. I’ve written down the pattern for future reference, I’m almost done with the crocheting part, I have a pretty filigree star to go on the top, and I bought lovely gold pearls to decorate the tree with – and then I ran out of steam. So it is currently sitting on top of my entertainment unit, mocking me every chance it gets. Plus I’m still working on my Nest Stitch Shawl.

Then I decided that I should make something out of the two skeins of Mandala Sparkle that I couldn’t resist picking up. I can’t tell you any more at this point, because I’m hoping this will be a present – sorry, you’ll have to wait. But now I’ve gotten bored with this one too.

I’ve been told that two more women of the family are pregnant and due in June and July. I bought a wonderful pattern from Kate Wagstaff called the Queen of Hearts Afghan (paid pattern here), which I think would make a great wedding/baby shower present. I plan on using Caron Simply Soft in white for the base, and blue mint, blackberry (a pink), limelight (a green), and persimmon (an orange) for alternating heart colors to give to the 1st-timer due in June. The woman who’s due in July already has two girls, so I’m not sure if we’ll be having a shower for her yet, but I’ll make something for her anyway.

I know this is rather late, but I hope that all of you had a wonderful New Year’s. I won’t be doing a “resolutions” post this year. The fact is that my resolutions are still the same – keep using my yarn stash (ok, I’m trying!), post three times a month, make my quilt afghan, and create my butterfly box. I did use some of my stash last year, but I was very bad and bought more yarn. I did finish the Martha Stewart fabric balls craft AND I finally finished organizing my bedroom/craft room – Yeah, two off the list! And of course there’s always the loose 10+ pounds, eat right, exercise more, and establish world peace. Maybe I’m just dragging my heels because if I actually finish the resolutions I’d have to come up with more (although that last one may take a while…).

Till next time, happy crocheting!


              Wishing all a bright, warm, and wonderful holiday season!

Snowflake

Yes, after many years I have FINALLY completed one of my New Year’s resolutions. This has nothing to do with crochet (register astonishment here), but it was a Martha Stewart Christmas craft project from at least 2008, if not before. Yes, I am talking about none other than Fabric Balls!

20181221_140750


Many moons ago Martha Stewart would have a half-hour craft show in the afternoon, and I loved it! (Some people do yoga, some meditate; I watch Martha.) I saw the program showing how to do the fabric balls and I was hooked. So I went out and bought the styrofoam balls – smooth ones are best, fabric – stretchy works best, and wonderfully elaborate ribbon. Then I became distracted with life…for a long time. However, I lovingly packed up the materials and promised myself I’d get to them some day.

My husband and I don’t give presents to extended family, but I began making ornaments to give away. A couple years ago I made one of Oombawka Design’s angels (free pattern here), and last year I made crochet baubles (free pattern here). But this year I steeled my determination and tackled the fabric balls.

Of course it wasn’t nearly as easy as I thought it would be. The main issue was that the template to cut out the fabric didn’t print out to the correct size, so there was quite a bit of adjustment to do. If you read the comments you’ll find I wasn’t the only one with this problem. The second issue was what to cover the ribbon ends with. I chose to order end caps and then flattened them with a hammer – you need at least 14 to 15 mm to cover and mine were a little small; or you could follow the suggestions given on the website.

All in all, I’m pretty happy with how these turned out – I just hope the people receiving them feel the same way!

20181219_150941-1

Not too long ago I came across a post from Anabelia Craft Design offering a delightful Stars Garland (free pattern here). I tried her pattern and it came out wonderfully, but I was really  looking for a dainty snowflake pattern. After playing a bit with Anabelia’s design, I was successful!

IMG_1101 - CopyA.jpg

I made the snowflakes with an D 3.25mm hook and Bernat Handicrafter acrylic size 5 yarn. (This yarn is discontinued now but Hobby Lobby still has their version. I like it because it has a nice sheen.) Of course you could use cotton crochet thread and a smaller hook to make tinier snowflakes, or a larger crochet hook and fingering/sport weight yarn to increase the size, but if using a larger weight yarn I would suggest a cotton or cotton blend because it’ll block better. At this point I haven’t added any extra decoration, but I certainly think a few rhinestones, sequins, and/or glitter fabric paint would be nice. The blocked snowflake is 3 1/4″ in diameter.


IMG_1100 - CopyA

These snowflakes would make a great garland, just like the stars in Anabelia’s design. They’d make cute ornaments, of course, but I could see these as tag decorations or as a wonderful embellishment to Christmas/holiday cards. Perhaps as a necklace or pin, or hat, scarf, or hair decoration. Let your imagination fly!

Sweet Little Snowflake Pattern / Easy skill level

Bernat Handicrafter Acrylic yarn size 5, or your choice of thread/yarn

Size D 3.25mm crochet hook (or size for your yarn)

Materials for blocking plus some form of starch.

Stitches Used – Ch – chain; Sc – single crochet; Dc – double crochet; Sl St – slip stitch; 2 Dc Tog – two double crochet stitches together; Sp – space; St – stitch; Hdc – half double crochet; Trc – triple crochet; FO – finish off

Snowflake is worked in rounds with right side always facing you.

Rnd 1 – Work 12 scs in a magic circle. Sl st in 1st sc.

Rnd 2 – Ch 2, dc in same stitch (counts as 2 dc tog). Ch 3. *In next st work 2 dc tog, ch 3*. Repeat * to * around to last ch 3 – sl st in top of ch 2 at start of this round.

Rnd 3 – Sl st in ch 3 sp, ch 6 (counts as 1 dc and ch 3). Dc in same ch 3 sp. Work dc, ch 3, dc in each ch 3 sp around. Sl st into 3rd ch of ch 6 at beginning of this round.

Rnd 4 – *In the next ch 3 sp work – 1 hdc, 2 dcs, 1 trc, 3-ch picot on top of trc, 2 dc, 1 hdc. In next ch 3 sp work sc, ch 3, sc.* Repeat * to * around. Sl st in 1st hdc and FO.

After I was done, I made tiny knots with my tails on the backside of the snowflake and put a dot of glue to secure them, then cut off any excess yarn. I dampened them with water and painted a light coat of commercial fabric stiffener on the back only. I had drawn 3 1/4″ circles that had been divided into 6 equal parts on plain white paper. Using a bulletin board or blocking mat, lay the paper down and cover with plastic wrap. Pin into place to hold. Using the circles and lines as guides, pin the snowflakes to block (making sure you use rust-proof pins). Let dry and decorate!

IMG_1099 - CopyA.jpg


It’s always a good idea to have a special time of year to stop, look around you, and take an accounting of all your blessings. Along with my family and friends, I’d like you to know that all of you are certainly counted among mine. Let the festivities begin!

giphyTurkey Day

In my last post I mentioned that I was working on a new cowl – and Ta Da! – the Stained Glass Cowl is now done. It took a while (25 hours + dealing with ends), but I’m really happy with how it turned out.

IMG_1069A - Copy

The cowl was made out of Loops and Threads Woolike in black, red, pumpkin spice, lavender, sage, and denim blue, with an E hook. I can’t tell you how much I love this color combination. It’s just so yummy! I also like how the stitch makes a bobble-ish type texture; I’ve always been a big fan of texture stitches. The black sc stitch rows were always worked with the front side facing you. The 7-dc shell stitch rows were alternated between the front and back sides.

A

I discovered another really neat textured stitch called the Nest stitch and I worked on a wrap (see below) with that stitch on the plane rides to and from my visit with my mom (had a wonderful time, BTW!). Again, this is a heavily textured, squishy stitch and I can easily see why this would be great for a baby blanket. I’m using the Ls & Ts Woolike for this project too, and it looks like it will turn into a really nice lightweight wrap/scarf.

IMG_1094 - Copy

Alas, I must put this aside to work on the Christmas ornaments that I give to my family. They’re not crocheted this year. Actually, I’m using a craft project from Martha Stewart that she showcased on one of her shows many, many years ago. You decorate styrofoam balls with lovely fabric, embellished ribbons, and anything else you think would look good. Of course, hers were gorgeous; I can only hope mine come out half as good!

Yes, I know. I kind of fell off the map for awhile, but before I go visit my Mom for her 92nd birthday, I felt I should throw a post together – just to make sure you all don’t think I’ve retired to some remote island somewhere. So, this is what I’ve been up to during my posting absence.

IMG_1053

As you might recall, my nephew’s wife is due in December (a girl!) and this is what I will be gifting her with at the shower this Saturday. The Unicorn Lovey I designed myself and the pattern is now available in my shop. The booties pattern still eludes me – sorry. The sweater is a free pattern offered by Caron Simply Soft yarn here. Lilleliis’ doll pattern is sold here, but I did add the crocheted heart applique based on Pink Milk’s free pattern. The baby blanket is based on the pattern by Debra O’Leary Patterns, Arielle’s Square, available for purchase here. The edging is different than her pattern – row 1 – sc around; row 2 – *hdc, skip one sc, ch 1, hdc in next sc*, repeat * to * around; and the bobble edge is *sl st in next st, sl st in next st, 3 dc’s in next st*, repeat * to * around. A simple but cute border, even if I do say so myself. And you could weave a ribbon in the hdc row if you wanted. The squares were whip-stitched together.

IMG_1057
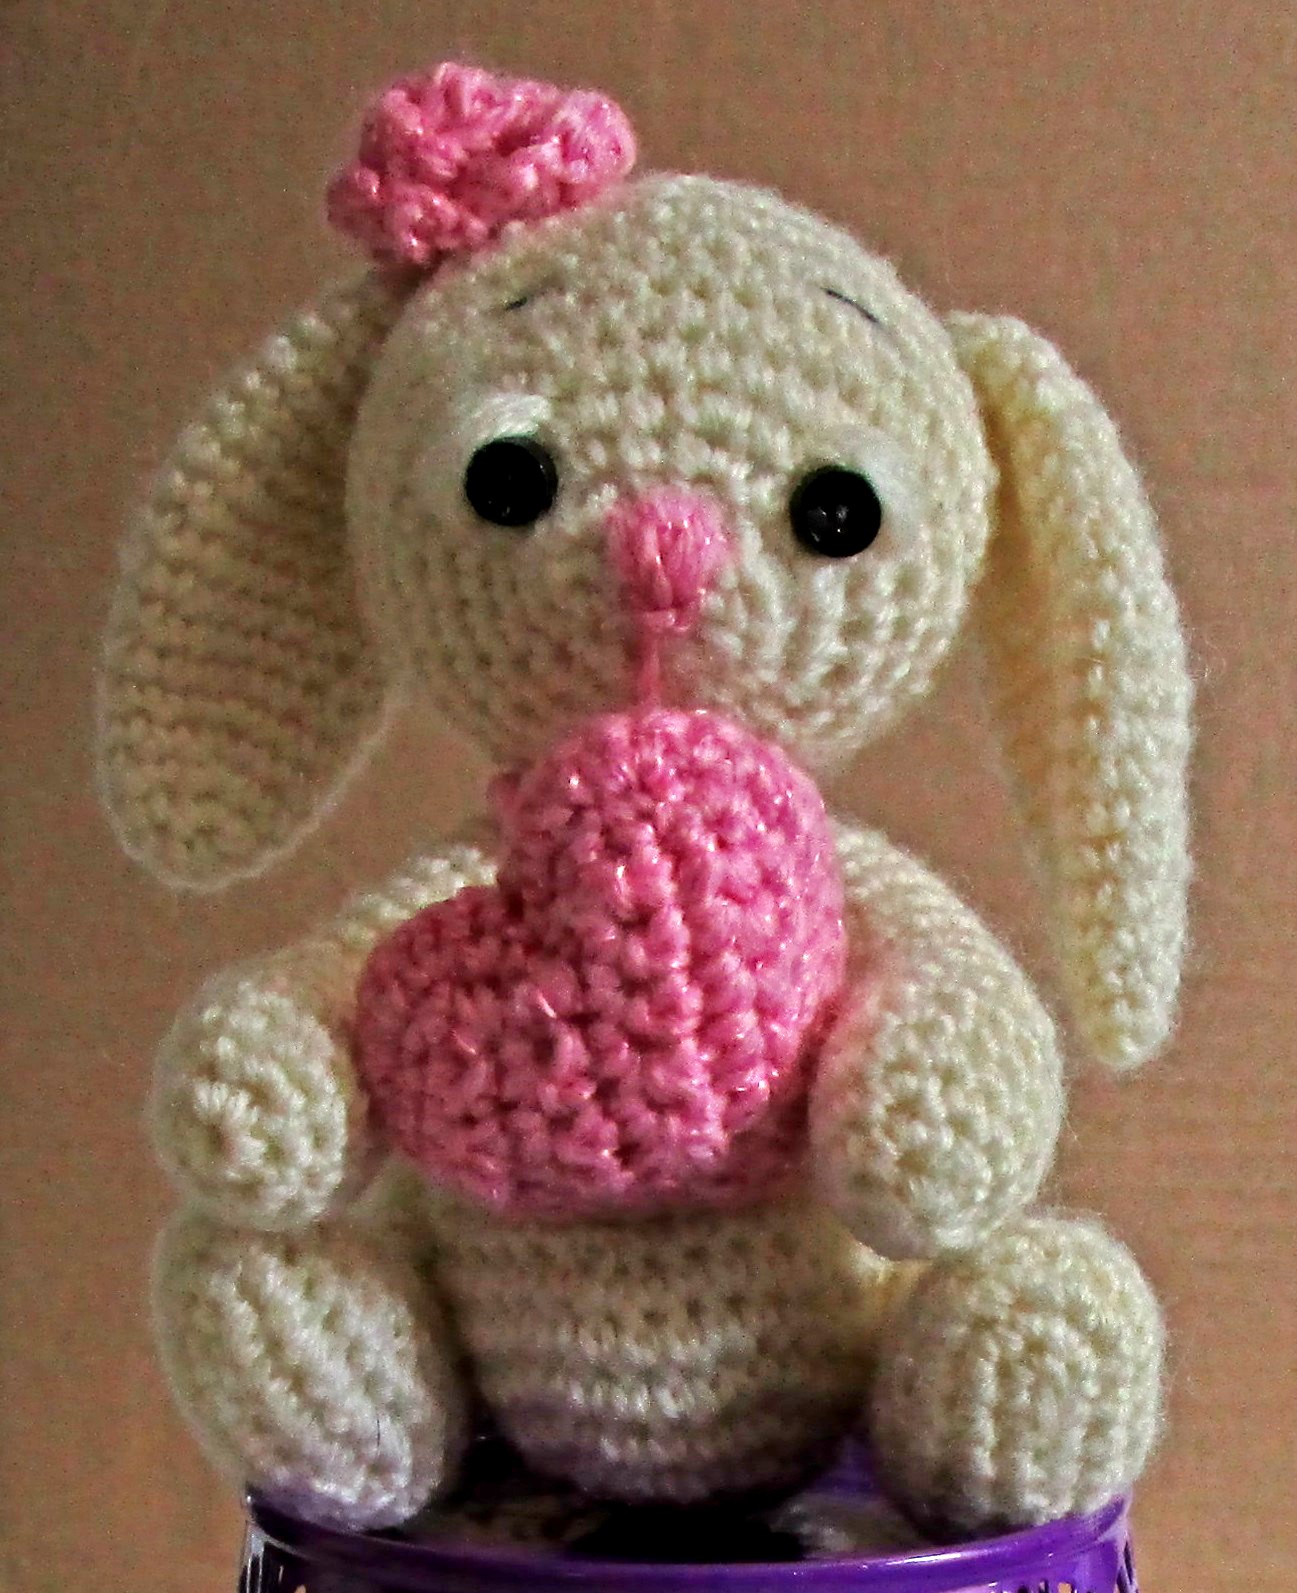
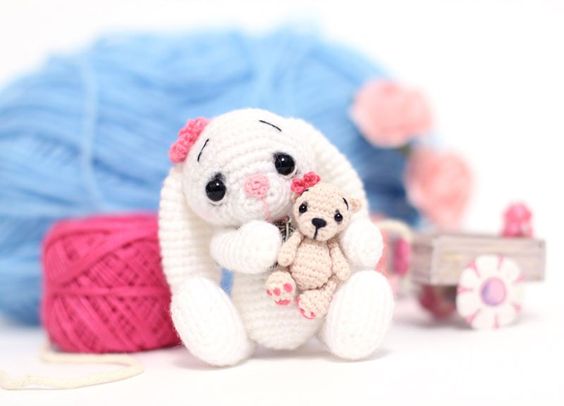
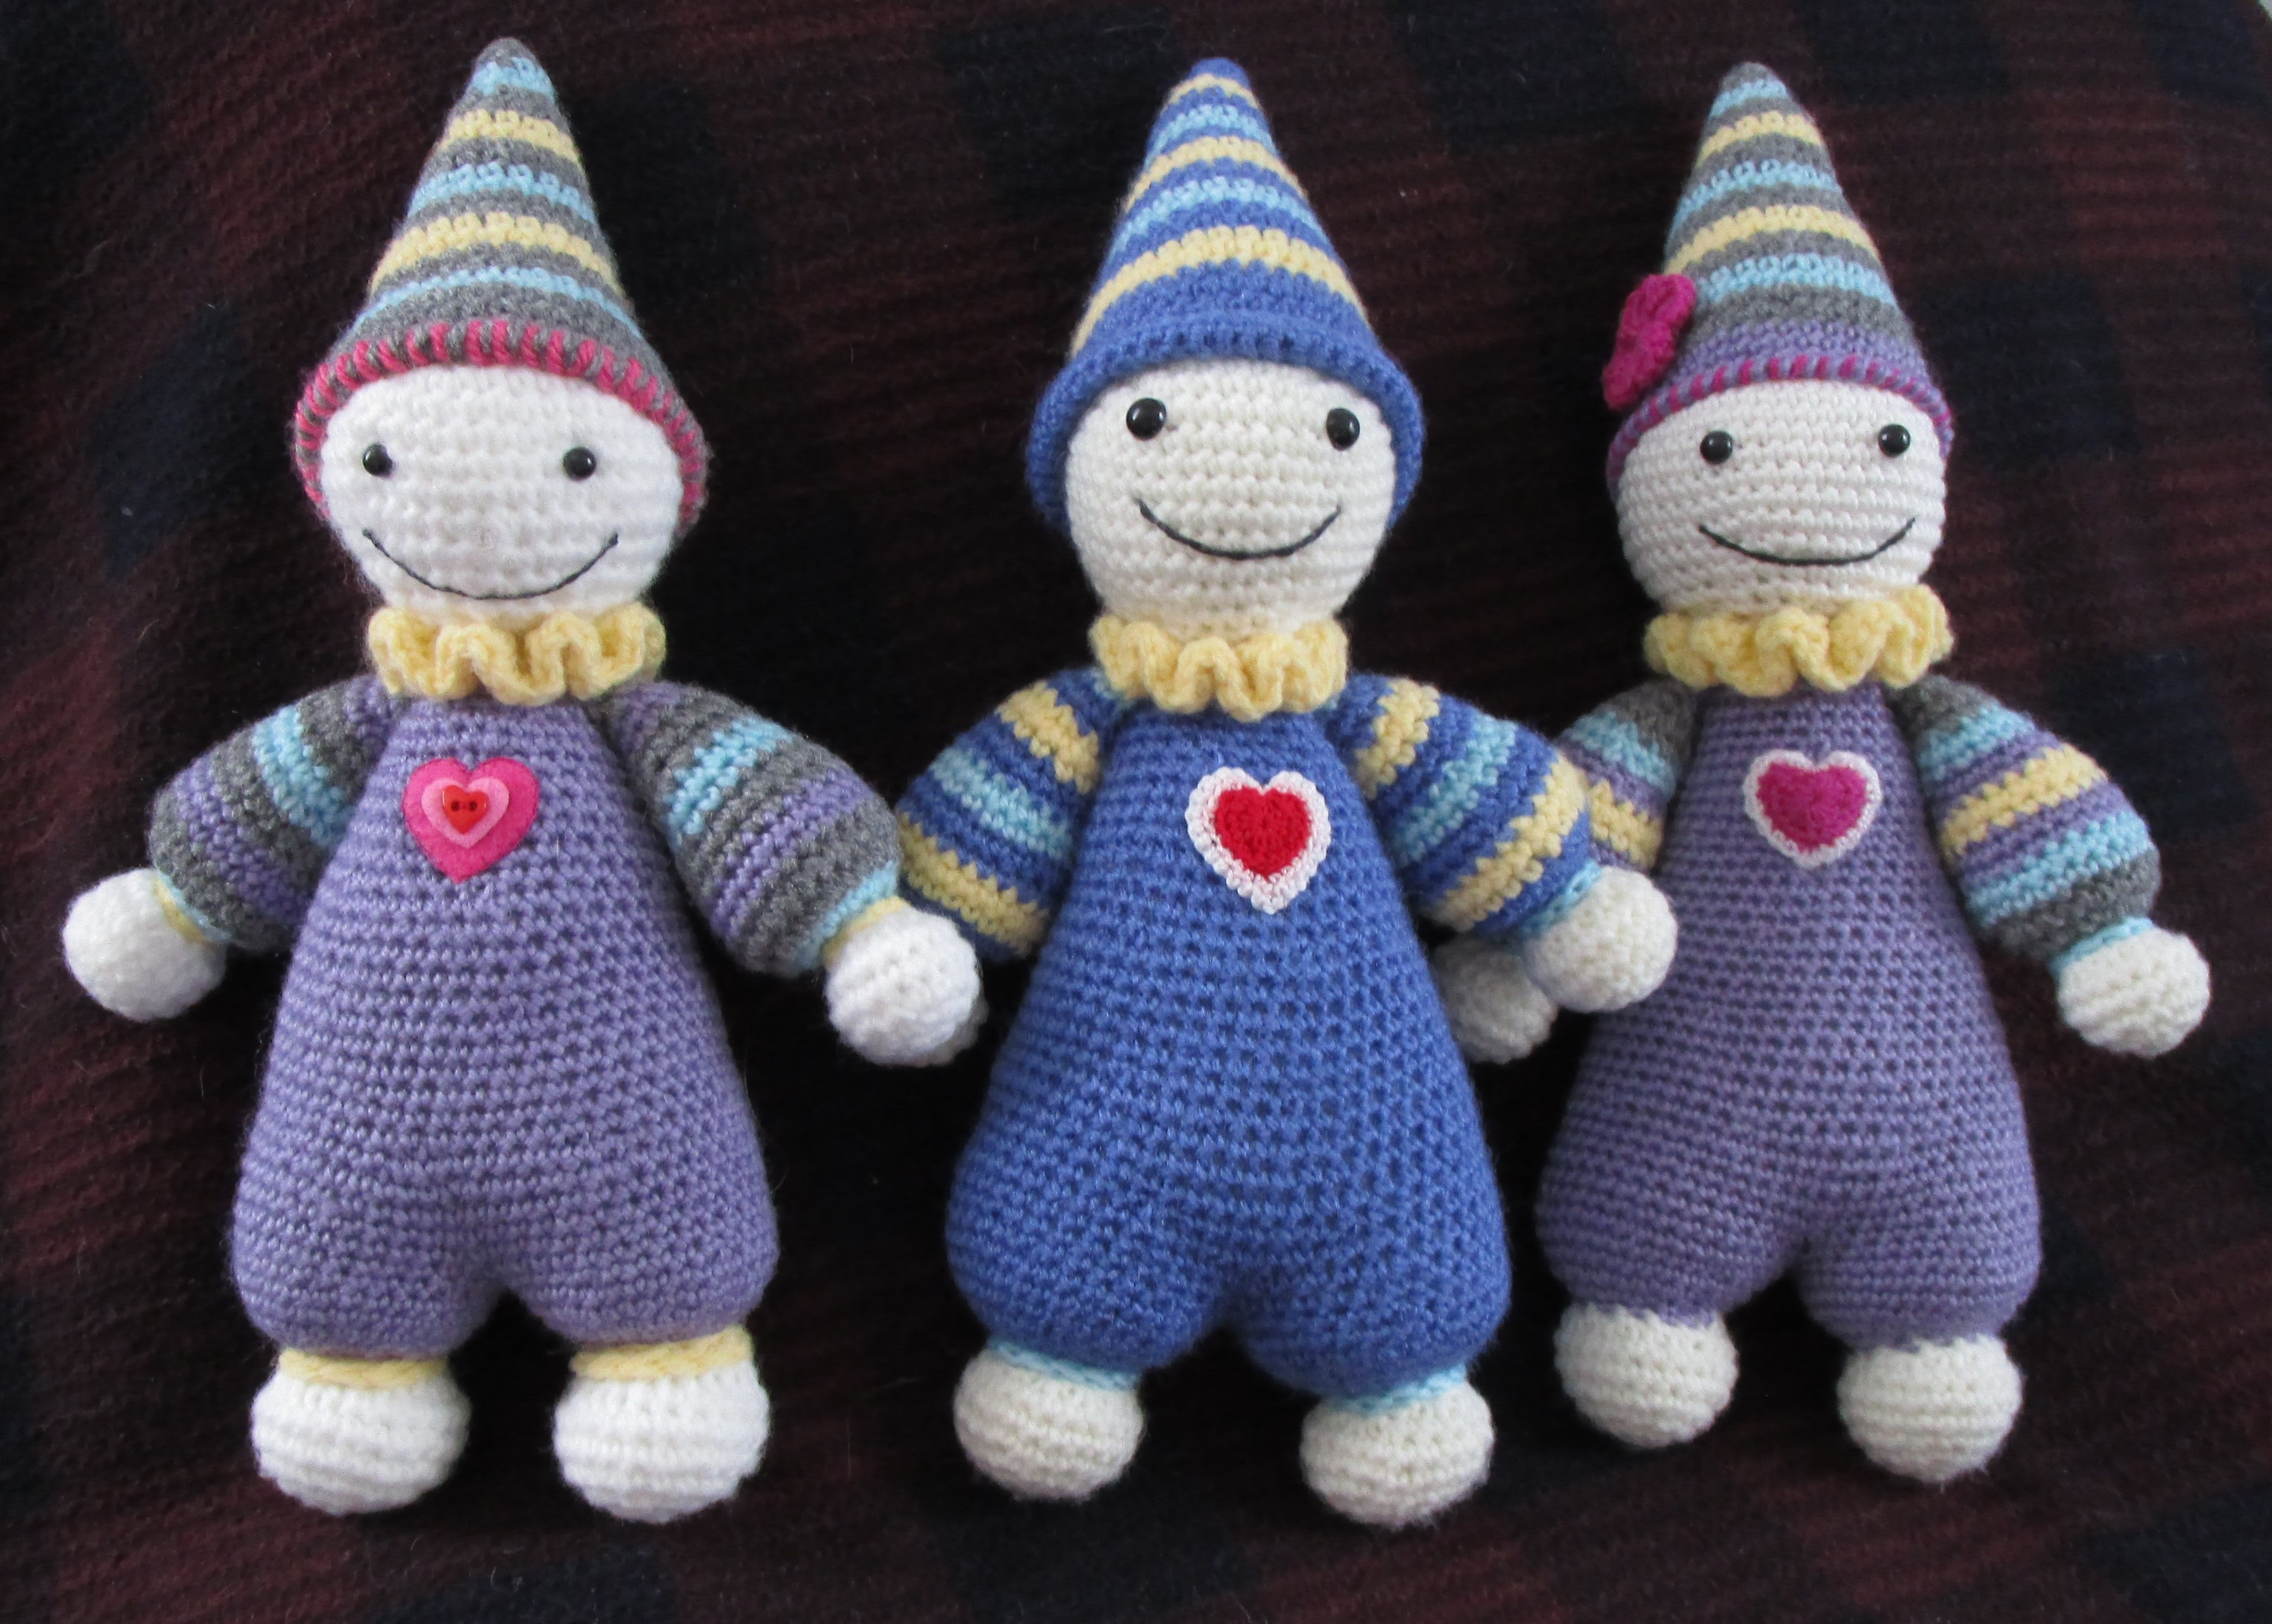
I am still totally in love with Lilleliis’ Cuddly Baby Amigurumi doll. The one on the right is being given away and I’ll list the middle one for sale in my shop. The one on the left is the first one I made. He has button eyes and a button heart on his chest, so he wouldn’t be any good for a baby/toddler. I think I may just have to keep him for myself!

IMG_1059A

I love doilies but really don’t have much of a use for them. I do like the idea of framing them or attaching them to hoops for decoration, though. This Wispweave pattern by Julia Hart really caught my eye, so of course I had to try my hand at it. She has much better lighting in her photos to show off the textural stitches, so go take a look at her post. Above is my version. I plan to try this in multi-colors – this could make a great base to a dream catcher. It is an intricate pattern and a little fiddly, but well worth it.

IMG_1062 (2)

In trying to keep with my resolution to use up my stash, I have delved into my collection of Loops and Threads Woolike yarn and began this cowl. It has been inspired by the very lovely and economical Botanica Cowl Kit being offered by Willow Yarns (anyone say “Christmas”?). I love the little “bobble-ish” texture my cowl is taking on, and I’m very happy with the colors. Plus, since Woolike is a fingering yarn, the weight of this cowl is perfect for the mild California winters.

Well, I hope this proves that even though I may be very behind in my blog posts, I certainly keep moving forward with my crochet projects. I hope everyone has a great Halloween, and I’ll see you in November. Till then, happy crocheting!

You know, they say a little knowledge is a dangerous thing. And sometimes life just makes sure I don’t forget it.

I’ve been crocheting fairly consistently now for about 30 years and I consider myself at an intermediate level, although I’ve certainly not had much of any experience making clothing. You know, the kind that actually has to fit. So every now and then I’ll be perusing Pinterest and I’ll find a photo of an item that I fall in love with, but then I find out I’d have to pay for the pattern. Since I have a very small budget, I try to be frugal. And sometimes I’m arrogant (and silly) enough to think that I can just figure out the pattern on my own.

Such was the case of the Metro Kerchief by Yuliya Tkacheva. Even though I am a lace fan at heart, occasionally when I see a beautiful geometric pattern I fall in love. And I fell hard for this one. But since my budget is tight, I thought (after looking very carefully at the scarf) that I could figure it out on my own. HA!

First off, you have to be careful to choose a yarn that has quite a bit of body to it because a soft yarn won’t hold the design. That was my first mistake, so I had to start over with another yarn. Next, after you figure out how to do the pattern, you have to figure out the correct increases/decreases, otherwise you will end up with either a VERY long scarf, a very short scarf, or a very lopsided scarf.

I won’t bore you will all the details, but this scarf took me almost a month to finally get right (and with a lot of mathematical help from my husband, too). Looking back on this now, that’s totally insane. Of course, when I started out I had no idea it would be so difficult for me (that arrogance again!), but at least the experience has taught me a lesson. Unless an item is super-super easy, JUST BUY THE PATTERN!

IMG_0920 - CopyA

The Urban Kerchief, now available in my Bonanza Shop

I have since completed my version of this scarf, and even though it took me forever, I am very happy with how it turned out. It is currently available for sale at my Bonanza booth – only $21.99 and free shipping! (Christmas is coming faster than you know….)

You know, technology is wonderful – when it works.

If you’ve been following my wondrous blog, you’ll know that my nephew and his wife are expecting a baby girl in December. So of course I have been in the process of making crocheted items for the newcomer, and spending waaay too much time looking through patterns. So. Many. Patterns.! Thus the lack of posts. At this point I have made a Caron Simply Soft Baby Hoodie, booties – sorry, I can’t find the pattern, a Cuddly Baby Amigurumi (which I’ve decided I need to remake because I didn’t put safety eyes on it – silly me) and I have designed a Baby Unicorn Lovey. I am in love with this lovey. I was having issues with the head when I first started, which took me about 3 days to finally work out. The rest all went pretty smoothly until I got to the mane. I did curly-q’s and sewed each one one separately, which was really tedious. But the lovey is done.

IMG_1038 - Copy - Copy

As i was creating the lovey, I was using the OpenOffice program I have on my laptop to type the directions. Of course this was just a scratch copy. So yesterday I went to put the official pattern together on my business stationary, correcting all my shortcuts and abbreviations (so people could actually understand what I had written) and arranging all the photos with their captions. Then I saved it. This took me about nine hours to do.  (Side Note – I don’t have a tester for my patterns, so when I write the final draft, I go over what I have written several times to make sure it is correct, concise, and understandable. I haven’t gotten any complaints so far, so hopefully I’m doing something right!)

For some reason, no matter what I try to save something as, my computer wants to save it to Word, which I don’t have on the computer. So I get up this morning and see that it was saved as Word, and the format is all wrong and the pics are all on top of one another. !&%$#@&^!!!! I had Word on my old laptop, but when it crashed we couldn’t transfer the program. The Microsoft Office Suite is so expensive that my IT Guru son downloaded OpenOffice for me. It’s ok but not nearly as good for my purposes as Word, and has always been rather frustrating for me to use. At this point I’m so frustrated I’m really ready to go back to Word. I see that there are some older versions that are for home/student use that could be used for my laptop and don’t cost extraordinary amounts. Well, I’ve decided that I’m going to see if my son is free this weekend and pay him a visit. HELP! Obviously, I am NO computer whiz, and no doubt some of my issues stem from the fact that I flounder around a lot. I won’t be surprised if my son finds out I screwed something up.

If you all would be kind enough to remember my computer in your prayers, I would certainly appreciate it. Now I’m going to fix myself a very large drink.

IMG_1046 - Copy

Hoodie sweater and booties for the Newbie!


I have totally fallen off the track with posting as I had promised myself at New Year’s. I went to a wonderful 4th of July/family reunion party and had a great time, but within a couple days the weather went to 112 degrees and I didn’t handle it well. (Neither did several of my plants, and I am afraid I’ve lost at least two of them.) Then last Tuesday my husband went in for surgery (all is well!), but I had to get up at 3:30 am to get ready to leave with him, which really threw my routine in a tizzy. Silly me, I brought a shawl to work on while I was waiting, but I was so tired I ended up having to rip out all that I had done. Oh well, it kept me busy. I’ve since caught up on my sleep and I am back with the living now!

My husband was just recently notified that his family is going to have a new addition. The nephew and his wife had a gender reveal at the July 4th party – it’s a girl! So if course that means anything I was currently working on or planning to work on has been set aside for now. There are so many wonderful things to crochet for babies – it’s so hard to choose! However, I remembered a particular doll that I had seen a while ago that I fell in love with, but it was a paid pattern so I took a pass. But now I have the perfect excuse for buying it! So I did. It’s called “Cuddle-baby – amigurumi doll” by Lilleliis and it cost about $4.68 in US dollars (4 Euros). The pattern is well written and easy to follow; it was me who screwed up, so of course it took forever to make.

Cuddly_Baby_medium2A

Cuddle-Baby – Amigurumi by Lilleliis

My suggestion is to make sure you have all the same weight yarn to make this doll with. I thought I did, but it didn’t take me too long to realize I didn’t. You see, I’m still trying to keep with using my stash, so I worked with what I had. I started with the head and then went on to the body. The yarn I used for the head was at least a DK and the body was definitely sport weight. The head was huge! So I had to unravel half the head and figure out how to make it smaller, which was time consuming. Then I realized I hadn’t worked the invisible decrease correctly on the body, which left odd little indents (they didn’t show until I stuffed it). I tried to fix it with a needle and thread, but it didn’t work. So I had to redo the body. Then I realized one of the hands was bigger than the other, but I was able to fix that with needle and thread. Geez, you’d think I was a novice crocheter for as much as I messed up!

I did decide to embellish a little, so I gave the hat a crab stitch edging with a pink whipstitch in between the grey stitches, and I added a triple heart applique to the body. Even though this little doll ended up taking a lot more time that it should have, I’m still happy with the outcome. I may add the stitching around the wrists and ankles, though – it does give a more finished look. That is, of course, if I can keep myself from starting the newborn booties, baby blanket, 12M sweater…well, you get the idea!

IMG_1007A

My version – not a bad runner up, hey?

There is one thing I found out that made me sad, though. While I was looking for the pattern on Ravelry, I found another person’s version of the same pattern for sale. It wasn’t done nearly as well, and now I can’t seem to find it. I can only hope that the original designer found it and told her to take it down. The nerve of some people! Another person was trying to crochet this doll from the picture (hadn’t bought the pattern) but was having problems figuring out the arms and legs, so she was asking for the directions on the pattern’s forum! The designer replied that what she was requesting was illegal and she was shocked that someone could do such a thing. Listen, I’ve made things from photos, too, but  I would never have the gall to go on the paid pattern’s site and ask for free directions! So sad this stuff goes on. And one word to the wise – unless a pattern is VERY simple, you’re going to spend A LOT of time figuring it out on your own. Trust me – I know! So you’d better think twice if it’s really worth saving a few bucks, IMO.

Till next time, keep on hookin’!

I have a definite sweet spot in my heart for all things amigurumi (or kawaii softies, if you prefer), and one of my absolute favorites are fairies. International – yes, INTERnational – Fairy Day has been designated for June 24th this year. (Just FYI, the tooth fairy has her own days on February 28th and August 22nd. I don’t know why she has two days, but maybe oral health needs the extra advertising!)

I took to Pinterest to find what fairies were available, and there were quite an assortment of delightful little cuties. The ones that are on my bucket list, though, are the ones from the Russian master class crochet. Of course, I would have to work my way up to that level! Perhaps I should start with some of the simpler ones….

Little Fairy

Sweet Little Fairy by Fun and Fang; free pattern can be found here

Tinker Bell

Adorable Tinker Bell by JanaGeek

Lucy-the-fairy-mouse

Who could resist Lucy the Fairy Mouse by LittleAquaGirl

Chrysanna-the-Albino-Fairy

Chrysanna the Albino Fairy by Epic Kawaii – Make sure to check out the other fairies by this designer!

Bella-Fairy

Unique Bella Fairy by Madelenon – she’s waiting to make your wishes come true!

Delaney-the-Good-Luck-Fairy

Delany the Good Luck Fairy by Fox in the Snow Designs – we all could use this fairy, right?

Fairy Elf

Sublime Fairy Elf by Alyona Dudakova; inspiration only, but you can visit here and here

Fairy House

Everyone needs a home, especially fairies – and this one doubles as a teapot cozy!

I hope you have the pleasure of a fairy sighting today, and happy crocheting!

In keeping with having products in my store to sell, I have just added another (and very colorful) item for sale – the Boucle Delight Cowl. I had originally made this as a scarf, but it ended up a little short, so i decided to convert it to a cowl. I know that I should have more summery items in the shop. I promise I will, but I’m still in the throws of reorganizing my bed/craft room, so when something pops up to add, I’m just going with it. In my world the months seem to fly by, so it’ll be fall before I know it!

IMG_0978 - CopyZ.jpg

The biggest problem I’ve had with this cowl is the photography. I didn’t use bright or neon yarn colors to make this, but in the photos the cowl really looks much brighter than it actually is. I tried taking a pic inside the house (thinking the sun was the culprit), but that didn’t work either. The next photo is much closer to the real colors.

canva-photo-editorZA.png

In articles about taking product pics, they tell you to use natural light (or “reveal” type light bulbs) as much as possible because this will show off the true color of the item. Obviously, direct sun doesn’t always work. Since I don’t have a room to set up for product photography or the money for a pro photographer, I just have to rely on photo editing programs to try to achieve the proper effect. Easier said than done!


Until next time, happy crocheting!


I went online to find Arthur a girlfriend.

At first, the best I could find was Re-Ment posable skeletons. They are numbered so you can tell which one you’re getting – #1 man I believe is the smallest at 3 1/4″ tall, #2 is supposed to be a child, #3 is a man at 3 3/4″, and #4 is a woman. A dog (1 1/2″ tall & 2 1/4″ long including tail) and a cat are also available.  (Note: the sizes listed on Amazon are wrong.) The thing that is so cool about them is that they are posable! Their jaws work too, and the humans come with an extra set of gripping hands. They said the #1 man can grip Lego swords, etc., but I haven’t tried that out yet. The company has even made playsets for these skeletons! I did buy the #1, #3, a dog, and a Lego dragon sword. As long as the sword works out, my oldest is going to get the #1 man and a sword. The problem is that the humans are way too small for Arthur (he’s about 12 inches).


But – wait for it – this is the exciting news! When I went back online, I actually found the same skeleton as Arthur! I can’t believe that after 20 years that he’s still in production. My oldest accused me of being deceptive – he claims that I gave him Arthur a long time ago; I say I didn’t. Now I can give him his own glow-in-the-dark friend! And what’s really funny is after all this time the reviewers’ complaint is the same I had – he falls apart too easily. Still haven’t figured out how to fix that yet.

IMG_0971 - CopyA

Arthur is so happy. I gave him a red cushioned chair to sit on, which is much better than the cardboard box. He loves his new puppy and is accepting name suggestions. He is really enjoying his two new friends, even if they’re quite a bit shorter than he is. I haven’t told him about his new girlfriend yet, because I want that to be a surprise. The only thing left is to make an “upholstered” chair, or maybe loveseat, for the new couple. Clothes, too. Must get busy on that, pronto!

As much as I love designing crochet items, I just have to give myself one long cold hard look in the mirror and be honest with myself. I love crocheting much more than I like having to write the patterns out. There, I said it. So I have decided to start using OP’s patterns and crochet! This doesn’t mean I won’t ever design anything anymore; it just means that I’ll have a “products” section in my store.

IMG_0876A

First up on this new(er) venture is my version of the Rose Lace Cowl by Alyssa Titus of Undeniable Glitter (free pattern can be found here). This was perfect for me because of all the Caron Simply Soft yarn I have in my stash, and it did take a little over one skein for the cowl (one skein for the body of the cowl and the “little more” for the edging). What a perfect and economical present! The pattern is written well – I didn’t have any issues following it at all – and the cowl works up in no time. My only disagreement with her description is that I think this cowl could be very warm and just fine for winter, as well as spring and fall. IMO!


IMG_0890A

I did run into one problem, though. My little picot points on the edging all swerved to one side, and I wanted them to point straight. Silly me thought that this would straighten itself out in the blocking, but it didn’t. Now don’t get me wrong – I’m not blaming the designer. It’s very possible that the way I crocheted the points made them swerve – I don’t know. Anyway, I took some thread and sewed the top loop of the picots down on the opposite side of the swerve, and this straightened them out. It was a pain, though. So if I ever make this cowl again, I’m going to find  way to crochet those points straight or consider the swerved points part of the design!

Till next time, happy crocheting!

I’ve been a little sluggish with my crocheting lately (and my posts!). I needed to take some pics too, and of course “sunny” California decided to be grey and drizzly for the past few days. However – TA DA – I have a few new things to show you. One item isn’t totally new, but I’ve finally completed it and have the pattern available now in my store, which you can find here. This is the afghan I mentioned in an earlier post, and I’ve named it Aqua Dreams. The Caron Simply Soft yarn is so pretty and the sheen is really nice. I was very angry at myself for making my traditional mistake of crocheting the beginning rows loose and tightening my tension as I go along – yes, I did it again – but I was able to work it all out with the single crochet/crab stitch border, so everything is fine now. And I am very proud of myself for using up an additional 10+ skeins of my stash!

IMG_0938-CopyABC

I was so happy with the way the Caron yarn looked that I decided to make another item with it – a long cowl with a lacy edging that you can double loop for added warmth. That’s still on the blocking mat, so you’ll get to see it in my next post.  I’ve also finished my version of the Metro Kerchief by Yuliya Tkacheva. I didn’t design these two items, so they’ll be going in my store as ‘products for sale’, a new category I’ll be adding shortly. I’ve also designed a scarf/shawlette, I’m working on a summer cowl, and I’ve finished my mom’s Mother’s Day present, but I’ll have more on those later. By George, i think I’m out of my slump!

IMG_0924A

Till next time, happy crocheting!


Officially spring began March 20th this year, but I am aware many parts of this country have still been feeling wintry effects. Well, tomorrow is National Gardening Day – yes, there is actually such a day! As many of us already know, crocheters also tend to like gardening, cooking, and cats (gardening and cats for me, cooking not so much). I had become a pretty decent gardener while I was back in Illinois. This is how my Illinois garden looked like much of the time (minus the lace curtains and mansion in the background) –

Garden GIF-downsized_large

Then about eight years ago my family and I moved to southern California. VERY different climates, to be sure. I thought I would still have my green thumb, but alas, things have not turned out so well. My CA gardening ventures have gone much more like this –

fail black thumb GIF by Studio Flox-downsized_large

Something tells me I should just keep to the crocheted versions of floral and fauna beauty. They stay fresh for so much longer! Someday I might even attempt this spring fantasy from Lunar Heavenly

DIYHowto-Crochet-Flower-Butterfly-Free-Pattern-20

Till then, stay warm and crochet on!

Well, I certainly hope that all of you had a wonderful Easter and didn’t go overboard on the sweets, like I did! I had plans of showing gorgeous carved eggs (that you can see here), or at the very least sharing a cute GIF (which can be seen here). Somehow those never came to fruition. I think I’ve been stuck in some kind of slow-motion gear that I can’t seem to get out of. However, I did get into the Easter spirit and decided to try out a pattern that I fell in love with some time ago. It’s the sweet “Little crochet bunny pattern” from Amigurumi Today (available for free here).

Amigurumi Bunny

Little crochet bunny pattern from Amigurumi Today

I do have yarn appropriate for making this, but I ran into a problem. The yarn is fuzzy and I was having great difficulty seeing the stitches. So I decided to switch to another yarn I have – sock weight without all the fuzz. Even though my version isn’t quite as cute as the original, I still think it turned out ok. Mine just looks a bit sleepy!

IMG_0797-CopyA

IMG_0798-Copy

Arthur took pity on my Sleepy Bunny and shared one of his heart pillows with her, originally seen here. I decided that Arthur shouldn’t have to sit on a box anymore, so I ordered a comfy retro-modern chair for him. However, I need to find a way to wire him, because Arthur has a terrible problem with falling apart. (The chair, while being very stylish, won’t give him a lot of support.) I did find a site that showed how to make an “upholstered” chair and I think Arthur would be ecstatic if I could make one of those for him – but crocheted, of course. Perhaps this will be my next project? But only after I finish the current WIPs…..

I always seem to be “a day late and a dollar short” when it comes to holiday themed posts. I know that St. Patrick’s Day is on March 17th, but I think I’m going to take a pass this year for posting wondrous Irish things. If you have an insatiable desire to see these lace beauties, please refer to a previous post of mine here.

Lately I’ve been working on an afghan that’s almost complete (yes, really!) and the Metro Kerchief by Yuliya Tkacheva (see pic below). I love the design of this kerchief, although if you make it slightly larger it would really be a shawlette, and I’m about halfway done. I know, I know – I’m supposed to be designing my own items – but sometimes it’s nice just to go with someone else’s pattern. If I don’t find someone to give this to I’ll probably just list it in my shop.

Metro Kerchief

Metro Kerchief by Yuliya Tkacheva

But I digress. Easter is coming, and I think I’ve been looking at this adorable bunny for so long that I must make her. There is no designer listed that I can find, but the free pattern is available at Amigurumi Today. If you are a Pinterest Peruser, I’m sure you’ve come across her – along with a million other items we all would like to make. Well, enough with the talking. I’ve got the yarn – I’ve got the hook – now wish me luck!

Amigurumi Bunny

Bunny

PS. I want the pattern for that little bear, too!

I’m late.  As some of you that follow me may have noticed, I have done several blog posts using a “national day” as a theme. Well, March 1st was National Pig Day and I missed it. The reason this is a big deal is that my mom loves pigs (Hi, Mom!) and has a wonderful collection of them. They’re mostly ceramic figurines, but she has a few other items too – like the iron flying pig doorstop or the pig-weighing-herself salt and pepper shaker, for example. Quite a while ago now my mom told all of us not to give her anymore pigs because she felt she had more than enough. I don’t always abide by that wish, but I’m sure she’ll find this “ode to the pig” blog post quite acceptable!

Baby Pig

Baby pig found on Pinterest – inspiration only, darn it!

Furls pig

Pig Amigurumi CAL by Brenna Eaves

Clown Pig

Clown pig – inspiration only

Keyring

Adorable key ring by Duls Stuff, inspiration only

willie the pig

Willie the Pig by Lan Lien, free pattern

2 pigs

Friends from Instagram, inspiration

Pig Lovey

Sweet Pig Lovey by Maiko

pippa A

Pippa Pig by Little Aqua Girl

20170506_145358-1-1A

Pig bookmark I gave my mom, pattern from Ashlea of HeartHookHome

Piglet

No post about pigs would be complete without Piglet! Free pattern from Holly’s Hobbies

Hope you all had a wonderful National Pig Day, and celebrated it by enjoying our porcine friends in whatever way you deemed appropriate!

Just the other day I received an email form Allcrochetpatterns.net describing their Granny Square Design Contest (find details here). I like granny squares. I have many granny square designs saved on my computer; I enjoy seeing posts with new designs; I even designed a square once (see below). However, I have never made anything with granny squares – but I was interested to find the history behind them.

20180222_132254-CopyA

I found an article from Etsy Yarn-A-Holics’ Confessions of a Yarn-A-Holic blog about the origin of the granny square (here): “According to a 1946 article attributed to the Oregon Worsted Company, the thrifty women of early America would carefully save scraps of yarn and fiber unraveled from old sweaters and socks. As these scraps accumulated, they were crocheted into small squares…sewn together to make a blanket which was both functional and colorful. Because grandma was no longer up for manual labor, she was often the one to sew the squares together, thus they became GRANNY SQUARES.” Makes sense!

Since the design contest sparked my interest, I took a little trip around the internet and found a wonderful post from Dorianna Rivelli of The Lavender Chair showing lacy crochet squares here. If you are not familiar with The Lavender Chair, please take a moment and visit the site – you will be delighted at Dorianna’s wonderful designs!


10-FREE-Lacy-Square-Crochet-Patterns-The-Lavender-Chair-768x768

Visit The Lavender Chair by Dorianna Rivelli for the patterns here.

These are all sooo pretty! But then again, I do have a major soft spot for all things lace. I don’t know if I’m going to design an entry for this contest because I currently have so many other things buzzing around in my head, but I certainly wish good luck to any crocheters out there that are willing to take the leap!


Arthur and I want to wish you the happiest of Valentine’s Days! Arthur is feeling quite dapper in his top hat and bow tie, and he really likes his new tri-heart pillow. Even though he hasn’t had a girlfriend in quite some time, hope springs eternal in his romantic heart – he’s believes that this year just might be his year. I promised I would try my best to find him a friend, and that if I can’t find him one, I’ll do my best to crochet something for him!

20180213_161439-CopyA

These “Puffy Hearts” have been designed by Repeat Crafter Me and the free pattern is available at http://www.repeatcrafterme.com/2017/01/crochet-puffy-hearts.html. I used a fingering yarn and a 1.90mm hook. The hearts came out to be 2″ wide and 1 1/2″ tall – perfect size for a key chain or hair accessory. I crocheted the top hat, but alas, black is very difficult to photograph well – especially for a non-professional!

Have a wonderful day, and have a piece of chocolate for me!

While perusing the internet, I saw the concept of using a crochet-covered can for a hook holder/organizer and I thought I’d give it a “whirl” (sorry, I couldn’t resist!). Anyway, I decided on a spiral design so that a person could put their smaller hooks near the middle and work outward as the hook sizes increase. For the can I just used a regular vegetable can, about 14.5 – 15.5 ounce size, cleaned with label removed. I used scrap sport weight yarn (although the pink had to be doubled) with an E hook. The nice thing about this design is that you could use a smaller or larger can, just make the initial spiral smaller or larger to fit the opening; the rest of the pattern would stay the same. I’ve always been in favor of flexible patterns, when possible! So without further ado, here is the pattern –

Whorled Crochet Hook Organizer  –  Skill level: Easy

Materials –

Vegetable can, cleaned and label removed

Scraps of sport-weight yarn (colors called A, B, and C)

Size E (3.5mm) crochet hook

Pattern –  Worked in the round with front side facing you at all times.

1. With A, create a magic circle, ch 1. In the circle work 1 sc, 1 hdc, and 2 dc. Do not finish off.

2. With B, attach yarn to circle and work 1 sc, 1 hdc, and 2 dc. Do not finish off. Repeat with C.

20180130_124302-Copy

Instructions 1 and 2. Yarns knotted on right side are just the tails.

3. Tighten magic circle. With A, work 2 dc in each stitch of color B. With B, work 2 dc in each stitch of color C. With C, work 2 dc in each stitch of color A (8 dc of each color). You will continue to work the colors over one another till the end of the crochet piece.

20180130_125232A

Progression of spiral.

4. Continue working 2 dc in each stitch until you have a total of 14 dc of each color.

5. Work 1 dc in each of the next 15 stitches with each color.

20180130_141739A

Spiral after Instruction 5.

6. Now begin working 1 hdc in each stitch around with each color. You won’t do any increases from this point on; this is the part of the crochet that will slip over the sides of the can – it will fit snug.

20180130_143605A

Hdc’s fitting over side of can.

20180130_182408

Crochet over can.


7. Continue working the hdc spiral until it just comes over the edge of the bottom of the can. Finish off two of the colors. Leaving a long tail with the third color, whip-stitch around each hdc and pull to tighten every few stitches. The piece should fit tautly over the can; finish off.

20180130_183540A

Instruction 7 completed.

8. Ta-Da!

20180131_134739ABC

Fini!

Just a couple more thoughts. If you want to make sure your hooks stay upright, putting some scrap yarn in the can to act as a cage style of “frog” device could work well.  Also, this pattern won’t work with hooks that have comfort grip handles (Clover, etc.) or even smaller thumb-hold type padding because 1) the spaces in the crochet aren’t large enough to accommodate the extra bulk, and 2) the hooks don’t slide in/out well because the padding hangs up on the yarn. But if you’re like me and have a bunch of the good ‘ol aluminum hooks, this is the organizer for you!

Yes, today is Penguin Awareness Day in the good old USA. See how enlightening this little blog can be?! Anyway, people are encouraged to think, read, discuss, or watch programs about these delightful creatures, but you are not required to dress in a tuxedo. There are even a whole array of jokes about penguins – most of them real groaners – such as “Q: What’s a penguin’s favorite relative? A: Aunt Arctica!”  (more of those available here). 

Of course, my interest lies in the crocheted versions of the formally dressed flightless birds. So, without further ado, I present ..The Penguin –

Penguin 1

So cute! Paid pattern from Make It Easy here.

Penguin 2

Just adorable hat, but inspiration only – photo here

Penguins 3

Cute and comical trio from Stephi’s Koestlichkeiten, free pattern in English here

Penguin 4

Baby set from Missy1107, product only here

Penguin 5

Precious baby penguin from Havva Designs, paid pattern here

Penguin 6

Charming kiddie clutch from Sarah at Repeat Crafter Me, free pattern here

Penguin 7 Skipper

Skipper of Madagascar fame from World Dreamer, free pattern here

Penguin 8

Sweet little applique! Product only from Savo Designs here

Penguins 9

Charming micro family from SuAmi, product only available here

Penguin 10

Darling rug from Irarott Designs, paid pattern here

Have a jolly (crocheted) penguin day!

As we begin 2018, contemplating last year and full of hope and inspiration for the new year to come, I have come to a conclusion. I don’t like new year’s resolutions. If you noticed my past new year’s blogs, I don’t believe I’ve managed to keep any of them. The materials for the quilt I want to make are still hanging in the closet (so patiently) and the garland of mini Christmas balls awaits quietly in its box. Sigh.

Anyway, I’ve given up on resolutions, but I discovered a new concept – coming up with one word to focus your year around. I like this! So I have decided this year will be about ORGANIZATION. Last fall my husband put in a new floor/baseboard and painted the back bedroom for me so I could turn it into my craft room. It’s not really a studio because it still has a bedroom set and my air walker in it, but it now has great craft organizing potential. So my first priority is to really go through every yarn, ribbon, pin and whatnot I own so I don’t have to search for an hour to find them! (Somehow I don’t look at that type of searching as an “adventure” anymore; tiresome is more like it.) And, yes, this was on my to-do list from last year, but of course other things got in the way.

I also need to organize my time, my blogs, and my social sites to improve the little business I have (click here), and my intention is to try to list one pattern or product a month. I want to start using my yarn stash, and I’m currently working on an afghan from stashed yarn (see photo). It was going to be a housewarming gift for my son and his girlfriend, but then I was told they have plenty of blankets and throws, so I guess I’ll sell it in my store. I’m using Caron simply soft with an H hook and alternating front post dcs, which is really giving it a subtle but nice texture.

20180111_140929

Close up of afghan WIP

Recapping 2017, though, I did manage to cut out refined sugar/carbs, lower my salt intake, and lose about 7 lbs – not much, I know, but I’m afraid the Sugar Monster got me at Christmas and I regained a few. BUT, I just had my regular blood tests done and everything came back fine! I also decided to invest in an air walker, and I think this will help me while being very gentle on the joints. So this looks like a pretty good start to 2018!

Yes,  I know the title isn’t exactly that original, but I do want to wish all of you a wondrous new year full of all good things – health, fortune, beautiful yarn, and of course crochet! Arthur wishes you a happy new year also, but he enjoyed much merriment and is now in the process of sleeping it off – as I’m sure a certain portion of America is doing, too!

Since my mom reads my blog – Hi Mom! – I couldn’t post her Christmas present till now. When visiting last fall, I noticed that her lapghan had really seen better days and needed replacing. My mom has a TV room with olive-colored recliners and a neutral beige/brown couch, and since this room is where she usually uses the lapghan, I wanted to get colors that would coordinate. After returning, I found myself wandering in the yarn section of Walmart and I discovered Lion Brand’s Mandala there, and at a great price too! I chose “Chimera”, which is a beautiful blend of brown, teal, olive, yellow-olive, gold, orange, and fuschia. I used two skeins and mirror-imaged them. What I love the most about Mandala is that the colors are nicely hued – there, but not too bright – and it’s a DK weight, which is fast becoming my favorite. I do wish that it was a little softer, but I guess we can’t have everything. I wanted to make her lapghan out of a no-pill acrylic, but fell in love with the Mandala chimera colors – what can I say?

IMG_0746-CopyAB

The lapghan laid flat

IMG_0760 - Copy

Close-up of the stitch

IMG_0760A

An angled view

IMG_0753-CopyA - Copy

People have asked me about this stitch and I will be making a video to post to YouTube on how to do this. I need to come up with a name (the ones I thought of had been taken) – I think I’ll call it the Diamond X Stitch. It’s reversible, a little stretchy, and a little squishy.  Oh, yes – Mom loved the lapghan and she especially liked that it was light-weight – go DK yarn!

To all my wonderful followers and those people who visit one of my social sites throughout the year, I thank you for all your attention to and well-wishes for my efforts. All of you are the reason I’m still plugging along!

I hope you all had a wonderful year and wish you and yours the best that this holiday season can give, and sincerely hope for all good things for you in the year to come.

MERRY CHRISTMAS AND HAPPY NEW YEAR from The Crocheted Butterfly…..and Arthur –

IMG_0768 - Copy

Bwaaahh-ha-ha-haa!! Ooh, um, er…cough, cough – I mean Ho! Ho! Ho! and Meeerrry Christmas!!

The Crocheted Butterfly

Specializing in Crocheted Flights of Fancy

notewords

handwork, writing, life, music, books

Zeens and Roger

Crochet. Colour. Craft

WordPress.com News

The latest news on WordPress.com and the WordPress community.